Knowledge Base
Adding a custom CDN provider
In this tutorial, we will walk you through the process of adding a custom CDN provider (one that is not natively integrated) into Constellix. Our Multi-CDN provisioning solution lets you route your traffic based on user location. This allows you to serve your content faster and more efficiently than a normal, single CDN configuration. Routing decisions are based on synthetic or real-user monitoring (RUM) and automated monitoring checks.
Note: Visit our How to Add a CDN Provider tutorial if you are adding a provider that is already integrated with Constellix (StackPath, Amazon, CDN77, or KeyCDN).
Monitoring regions include:
- North America East
- North America West
- Europe
- Asia-Pac
- Oceania
- South America
Common Use Cases for Multi-CDN
Multi-CDN can assist with speed and performance enhancements, reduced latency, and SEO improvements for your domain. It also ensures 100% uptime and lets you manage your CDNs in one place, which saves time and eliminates the frustration of managing several CDNs on different platforms.
Note: To learn more about how our Multi-CDN services work: Real-user Monitoring (RUM) and Multi-CDN Provider Use Cases.
Prerequisites
Services have already been configured for each CDN provider you are adding to this configuration
You have the RUM URL for your CDN providers that are not natively supported (if any)
You have all SSL Certificate information (only needed for domains running over HTTPS)
Note: Global Traffic Director must be enabled before applying CDN provisioning to a domain.
How to Add a Custom CDN Provider to Constellix
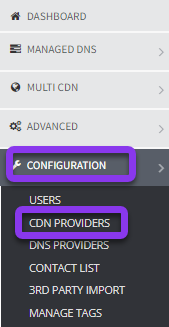
1. Navigate to Configuration> CDN Providers
After logging in to the Constellix DNS dashboard, select Configuration on the left-hand side menu to expand options and then click CDN Providers.

2. Add a Custom CDN Provider
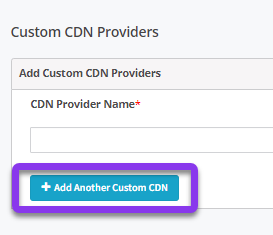
Enter the CDN Provider’s name in the Custom CDN Providers section at the top of the page, and then enter or paste the RUM URL for the perspective CDN. Next, click the gray Save button on the right-hand side of the screen.
Note: To retrieve your RUM URL, download and configure the pixel image in your web server. Next, log into your CDN provider and pull the zone. Copy and paste the URL provided by your CDN (https://examplecdn.b-cdn.net) and append the location to the pixel image, which would be (/1pixel.png).
If you need to add another custom CDN provider, click the blue +Add Another Custom CDN button and repeat the above step.

Your custom CDN has now been added to Constellix.
Note: If you need to add an SSL certificate, visit our tutorial on How to Add SSL Certificates.
Your CDNs have now been added to our system. Visit our Configure Multi-CDN (Synthetic) or Configure Multi-CDN (RUM) tutorials for help with setting up Multi-CDN.
Visit our website for more information on our services and features.


