Knowledge Base
Weighted Round Robin
Overview
One of the most common load balancing techniques is Round Robin, which is used to balance traffic across multiple servers. While basic Round Robin is restricted to even distribution, Weighted Round Robin can be dispersed among servers unevenly. In Constellix, this is achieved using DNS record pools. In this tutorial, you will learn how to create a record pool with a Weighted Round Robin configuration. For example purposes, we will be using A record pools, but the steps apply to AAAA, CNAME, and ANAME record pools as well.
Common Use Cases for Weighted Round Robin
Weighted Round Robin is most used in DNS configurations when web traffic needs to be distributed across multiple servers based on capacity, performance, or cost. To learn more about load balancing, visit our DNS Load Balancing resource.
Prerequisites
- A domain has already been added to your Contellix account
- You understand the basics of load balancing
- Records have been created or imported for your domain
Note: We have several tutorials on creating records if you need help. Visit our record pool guides for assistance with setting up pools for different record types.
Configure Weighted Round Robin With Record Pools
- Log in to the Constellix Dashboard
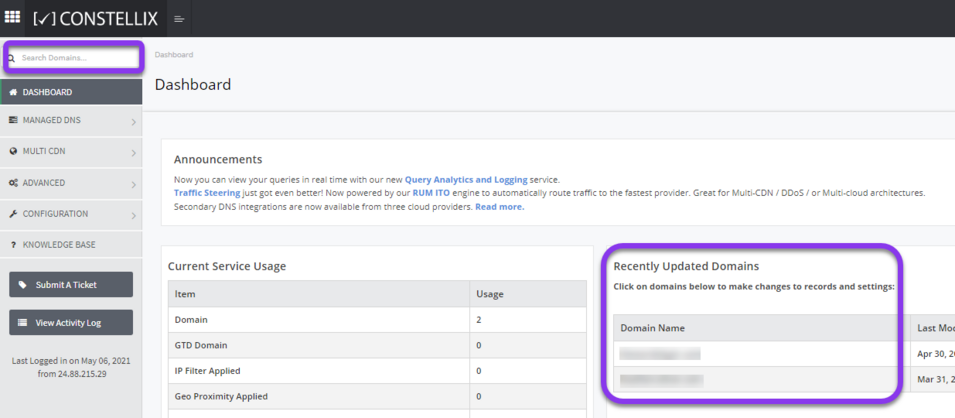
In the Constellix dashboard, select your domain from the Recently Updated Domains list or search for the domain in the top-left search bar.

Note: Options available may vary depending on the current configurations set for your domain.
- Click Managed DNS and Select Record Type
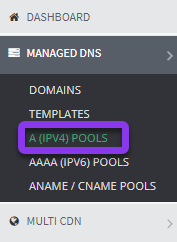
Once in the Dashboard, select Managed DNS in the left-hand sidebar menu. This will display a drop-down list of DNS configuration options. Select A (IPv4) Pools from the drop-down menu.

- Click Add New Pool
Next, select the green + Add New Pool button on the right-hand side of the screen.

- Enter Values
The Add Pool A pop-up window will display. Add the information for your pool by following the steps below:

A. Name: Give your pool/Weighted Round Robin configuration an identifiable name.
B. Num Return: Specify the number of IPs you want to have returned in the pool.
C. Min Available: Enter the minimum number of IPs that must be available in the pool.
D. Enable ITO: ITO is a latency-based load balancer that accounts for round trip time (RTT) and is especially useful for multi-cloud environments. Visit our What is ITO Latency-based Load Balancing resource for more information.
E. Contact Notify: This option allows you to select a contact list to send notifications to. If you have not set up a contact list yet, visit our tutorial on How to Create a Contact List.

F. IP: Enter the IP address (or host) you are pointing to.
G. Weight: When using Weighted Round Robin, you can choose a different weight for each IP, depending on how you want to optimize your traffic. A higher weight will send more traffic to that IP.
H. Sonar Check: If you set Policy (see step I. below) to "Follow Sonar" or "Off on Failure," click in the “Sonar Check” field and select the desired Sonar Check from the drop-down text box.
Note: You can filter through the options by typing the associated IP or fully qualified domain name (FQDN) in the text field.
For "Always On" or "Always Off,” skip this step.
I. Policy: There are four policies:

- Follow Sonar - turns the record on or off depending on the status of your preconfigured Sonar Check.
- Always On - ensures that the value is always active in the pool.
- Always Off - ensures that the value is not returned. This allows you to keep the value "off," but kept in place for later use.
- Off on Failure - similar to the Follow Sonar except once Sonar marks the check as "down," that specific record will no longer be returned, even after the resource becomes available again.
J. Active: This column displays whether the IP is active or not being returned.
K. Speed: If using ITO, the connection speed will be shown here.
L. Status: This column represents the UP or DOWN status of IPs according to the associated Sonar health check.
M. Trash: Clicking the red trash can icon will permanently delete an IP from your record pool.
N. Add Another IP: You will need to click this option for each additional IP you want to add to the Weighted Round Robin record pool configuration.
Once you have entered all the necessary values for your record pool, click the green Save button at the bottom left of the pop-up window to store the pool.

5. Apply Pool to Domain
Be sure to apply the pool(s) to your domain for your configuration to take effect. If you need help with this step, view this tutorial.
Visit our website for more information on our services and features.

