Knowledge Base
CERT Records
Certificate (CERT) records are a type of resource record that stores certificates and their related certificate revocation lists (CRLs) in the domain name system (RFC 4398).
Common Use Cases for Cert Records
These certificates act as a means of domain security by binding public keys to digital signatures and are used to verify the authenticity of the sending and receiving parties of DNS queries.
Prerequisites
- A domain is already added to your Constellix account
- You have all the necessary certificate information that applies to your domain
How to Create CERT Records in Constellix
1. Log into Constellix and Select Domain
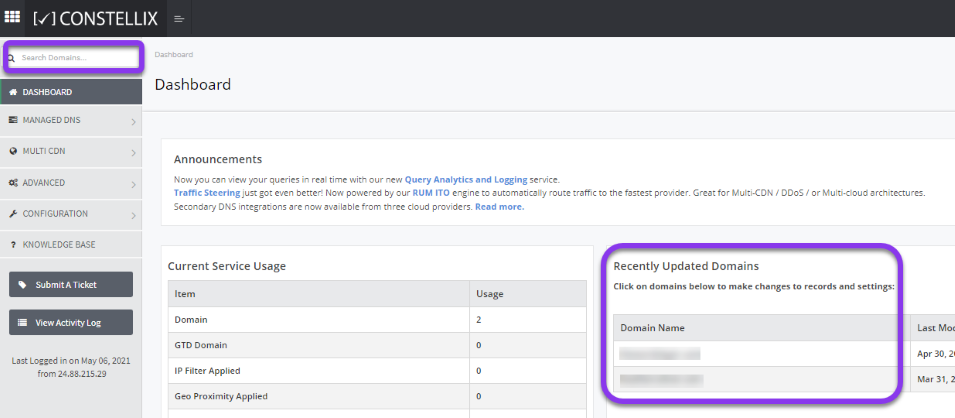
Log into Constellix. Once in the dashboard, select your domain from the Recently Updated Domains list or search for the domain in the top-left search bar.

Note: Options available may vary depending on the current configurations set for your domain.
2. Expand CERT Record Options
After selecting the domain that needs the CERT record, you will be taken to the Records page. If you have not configured any CERT records for this domain yet, click the green + icon beside CERT Record to expand options, otherwise skip to step 3.

3. Add CERT Record
Once options are expanded, click the green + icon to create your CERT record.

4. Enter Record Values
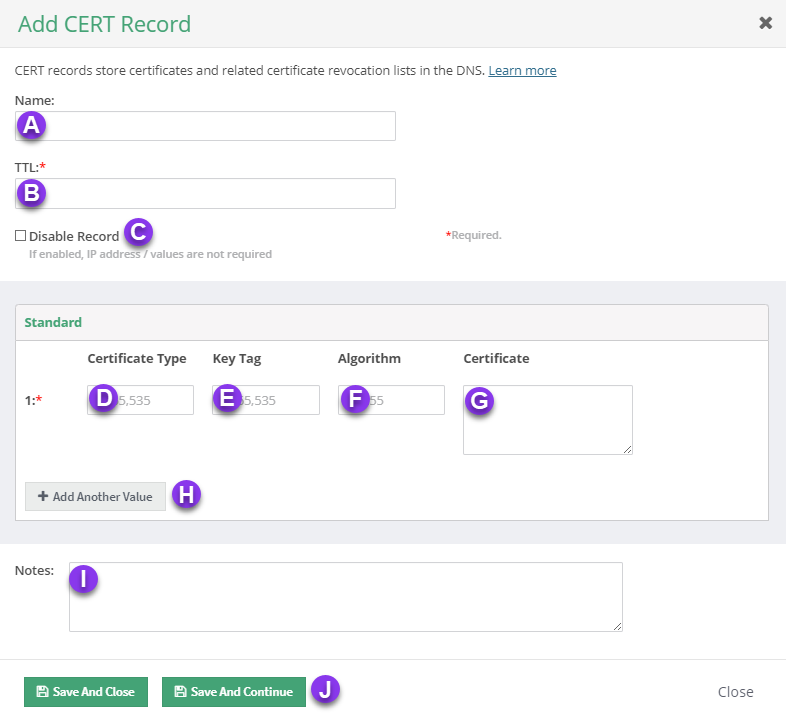
You should now see the Add CERT Record pop-up window.
Fill out the following values:

a) Name: Enter the name of the record. Alternatively, this field can be left blank to signify it is at the root domain.
b) TTL: Time to live (measured in seconds) determines how long a record is cached in nameservers. Visit our What is TTL resource for more information and best practices for TTLs.
c) Disable Record: With this feature, you are able to remove records from our nameservers without removing the record configuration in the Constellix DNS control panel. See our Disabling a Record tutorial for more information.
Note: We recommend setting the TTL for CERT records be set to 3600 (the default in Constellix). If the record is not expected to change, you can enter a longer TTL.
d) Certificate Type: This field is where you add the numerical value that specifies the certificate type (defined by RFC 4398).
e) Key Tag: The key tag field is the 16-bit value computed for the key that is embedded in the certificate using the RRSIG key tag algorithm.
f) Algorithm: Add the cryptographic algorithm used to create the signature.
g) Certificate: Enter the actual certificate value
h) Add Another Value: This option allows you to add another CERT under the same record name
i) Notes: The note section lets you add important details and keywords so you can easily search for specific records later (optional, but recommended).
j) Save: If you need to add an additional CERT record, tap the green Save and Continue button, otherwise, click on Save and Close.

