Knowledge Base
Create a NAPTR Record
Name of Authority Pointer (NAPTR) records provide multiple means of contacting a domain and are mostly used for applications in internet telephony. NAPTR records are commonly used to map servers and user addresses in the Session Initiation Protocol (SIP). In conjunction with Service (SRV) records, they allow multiple records to be chained in order to form complex rewrite rules which ultimately produce new domain labels or uniform resource identifiers (URIs).
NAPTR records are established to describe the resources that will be used via a connection between a server and user address and define the protocols available for communication with the mapped resource.
Common Use Cases for NAPTR Records
NAPTR records are used to set an order to the communication values, establish a preference, and enact replacement patterns in the event one communication fails.
Prerequisites
- A domain has been added to your Constellix account
How to Create a NAPTR Record
Once logged into your Constellix DNS dashboard, the following steps will guide you through the process of creating a NAPTR record for your domain.
1. Select the appropriate domain
In the Constellix DNS dashboard, select the domain you want to add a NAPTR record to from the Recently Updated Domains list. Optionally, you can locate the domain using the search bar on the upper left.
Note: Options available may vary depending on the current configurations set for your domain.
2. Expand NAPTR Record Options
Once the domain is selected, you will be directed to the Records page. Scroll down to NAPTR Record. If you have not configured any NAPTR records for this domain yet, click the green + icon beside NAPTR Record to expand options, otherwise skip to step 3.

3. Add the NAPTR Record
Click the green + icon from the row of action symbols to add the record.

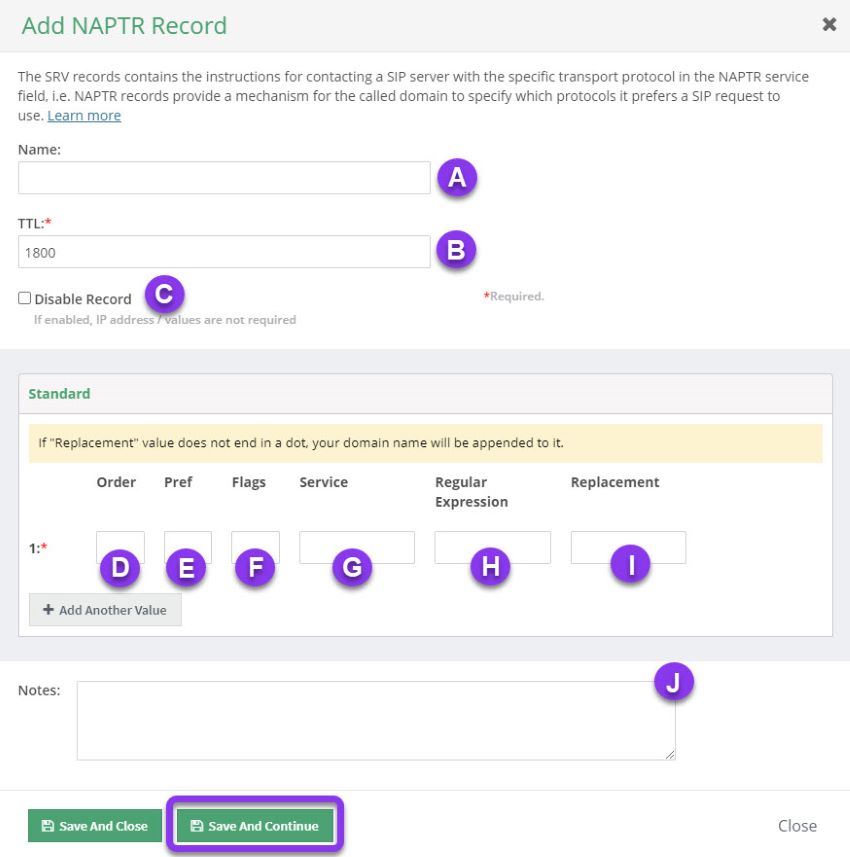
4. Enter the NAPTR Record Values

a) Name: Enter the name of the record. To set the record for the root domain (@), leave this field blank.
b) TTL: Time to Live, measured in seconds, determines how long the record is cached in resolvers.
For more information on best practices for TTLs, visit our What is TTL resource.
Note: The TTL for NAPTR records defaults to 1800, but this can be adjusted according to your organization’s needs.
c) Disable Record: This checkbox will disable the record from the nameserver while allowing its configurations to remain in the Constellix DNS control panel.
See our Disabling a Record tutorial for details on the NX Domain feature.
d) Order: Enter a number that will be representative of the entry’s communication priority.
Note: When multiple NAPTR records have the same reference number, a sequential order will need to be defined.
e) Preference: Enter a number of preferences for the entry.
Note: Similar to MX levels, with multiple NAPTR records, the one with the lowest order number is always tried first.
f) Flags: Enter one of the four possible flags:
- S: denotes that an SRV lookup is to be performed on the output of this NAPTR record
- A: directs the result to be looked up as an A or AAAA record
- U: directs the application to process the absolute URI NAPTR result
- P: would signify a "non-terminal" rule where additional NAPTR lookups would be necessary. It is application-specific and can be evolved, or mutated by regular expressions.
g) Service: Enter the application-specific service option utilized to reach the domain.
Example: “SIP+D2U” is SIP over UDP
h) Regular Expression: Enter a number of preferences for the entry.
i) Replacement: This is used to assist in enacting replacement patterns. You could use this to substitute the entire name or parts of the name used in the original query.
Note: If you have a regular expression, you cannot have a replacement.
j) Notes: This section allows you to add any pertinent information associated with the record along with keywords to allow you to search for your records later. It is optional but recommended.
Click on the green Save and Close button to save changes or Save and Continue to save and create more NAPTR records. Optionally, click on Close to disregard changes.
Don’t forget to commit changes after making any type of record modifications for a domain. If changes are not committed, the record will not be applied to your domain.
Visit our website for more information on our services and features.


