Knowledge Base
Create an NS Record
Nameserver (NS) records indicate which DNS servers are authoritative for a domain or subdomain. These are the nameservers that store the DNS records for the domain.
NS Records define the name of the zone’s domain nameservers. Since these types of records don’t include IP addresses, an A record needs to be established for the domain prior to adding an NS record to ensure the resolution request succeeds. For use with Secondary DNS, an A record would need to be established for both DNS servers.
Common Use Cases for NS Records
NS records are most commonly used when Secondary DNS is established. This allows a second set of DNS nameservers to be authoritative for the domain. These records are part of the “backup” solution that Secondary DNS provides by directing resolution requests to the alternate DNS server in the event one is offline.
There are instances in which subdomains need to point to a different nameserver. In these cases, NS records are used to point the subdomains to the external nameservers.
Note: Unless you have a special use case that requires a customized NS record, you do not need to add one to a domain in the Constellix dashboard. They are automatically assigned as nameservers upon creation.
Prerequisites
- A domain has been added to your Constellix account
- An A or AAAA record has been created for the domain
Note: For help with record creation, visit our tutorials on creating records. If you need help adding a domain, we have a step-by-step guide that walks you through this process.
How to Create an NS Record
Once logged into your Constellix DNS dashboard, the following steps will guide you through the process of adding an NS record to your domain.
1. Select the appropriate domain
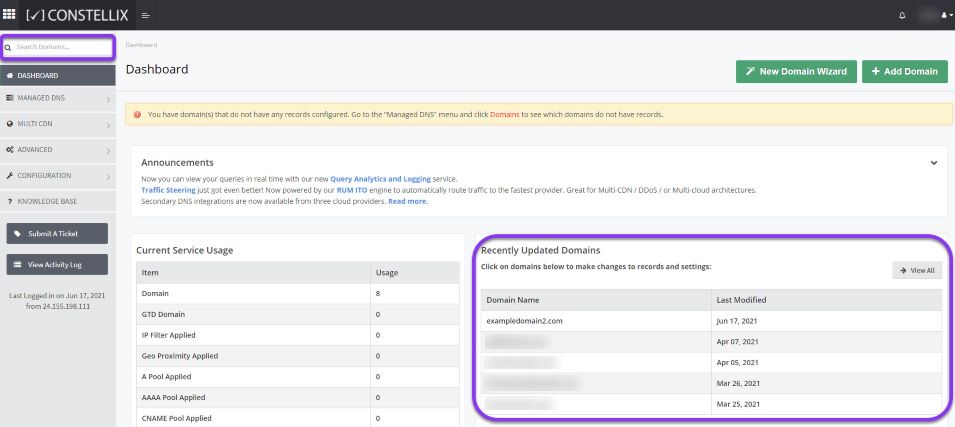
In the Constellix DNS dashboard, select the domain to which the NS records will be added from the Recently Updated Domains list. Optionally, you can locate the domain using the search bar on the upper left.

Note: Options available may vary depending on the current configurations set for your domain.
2. Expand NS Record Options
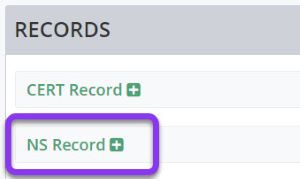
Once the domain is selected, you will be directed to the Records page. Scroll down to NS Record. If you have not configured any NS records for this domain yet, click the green + icon beside the NS record to expand options, otherwise skip to step 3.

3. Add the NS Record
Click on the green + icon from the row of action symbols to add the NS record.

4. Enter the NS Record Values

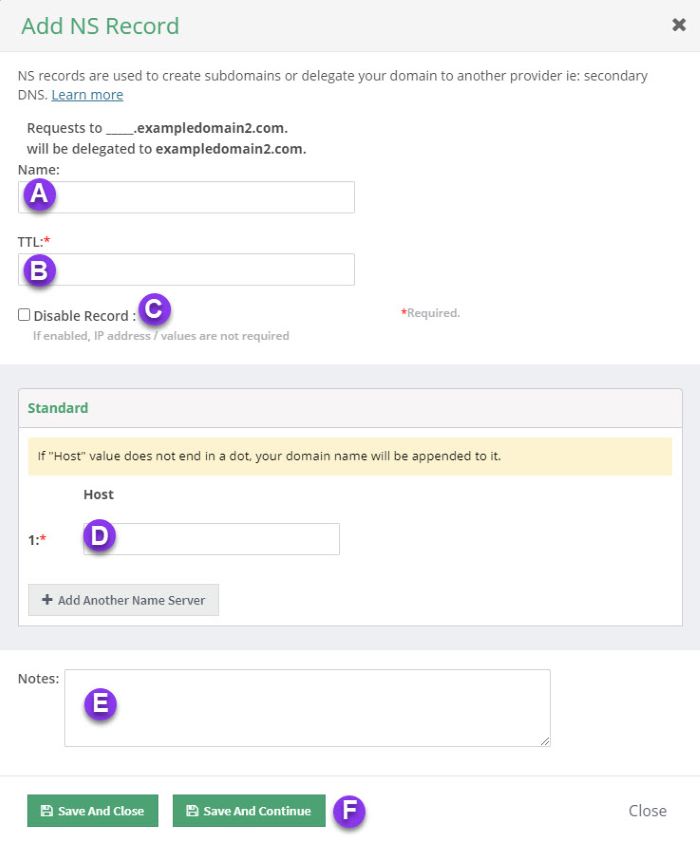
a) Name: Enter the hostname for the record.
b) TTL: Time to Live, measured in seconds, determines how long the record is cached in resolvers.
For more information on best practices for TTLs, visit our What is TTL resource.
Note: For NS Records, we recommend a TTL of 86400. This is due to the large volume of queries generated for these record types and the extremely low rate of changes they require. NS records are also queried alongside any query for your domain.
c) Disable Record: This checkbox will disable the record from the nameserver while allowing its configurations to remain in the Constellix DNS control panel.
See our Disabling a Record tutorial for details on the NX Domain feature.
d) Host: Enter the fully qualified domain name for the nameserver. For example, ns0.nameserver.com.
Note: The domain name is automatically appended to the end of this field unless it ends with a dot (.).
e) Notes: This section allows you to add any pertinent information associated with the record along with keywords to allow you to search for your records later. It is optional but recommended.
f) Save: To add more NS records, click on Save and Continue, otherwise, select Save and Close.
Note: Don’t forget to commit changes after making any type of record modifications for a domain. If changes are not committed, the record will not be applied to your domain.
Visit our website for more information on our services and features.

