Knowledge Base
Create an SRV Record
An Service (SRV) record is intended to provide information on available services for systems, such as internet calls and messaging, and is required by certain internet protocols. Whereas most records contain only a specific IP address or hostname, SRV records also include a designated port. This record type has a priority value (similar to MX records) and a weighted value (similar to Round Robin).
Another important aspect of SRV records is that they have a unique naming convention that must be adhered to in order for the record to function properly.
Below is an illustration of how SRV records are formatted, which represents the service record for web requests for a domain. For demonstration purposes, we will use “anexampledomain.com.”
_http._tcp.anexampledomain.com.
Common Use Cases for SRV Records
SRV records are most commonly used with Session Initiation Protocol (SIP) configurations, which control the communication options for your domain. For instance, SRV records can be configured for online messaging, video, or voice chat.
Prerequisites
- A domain is already added to your Constellix account
- You have all the necessary IP addresses or hostnames for your domain
How to Create SRV Records In Constellix
1. Log into Constellix and Select Domain
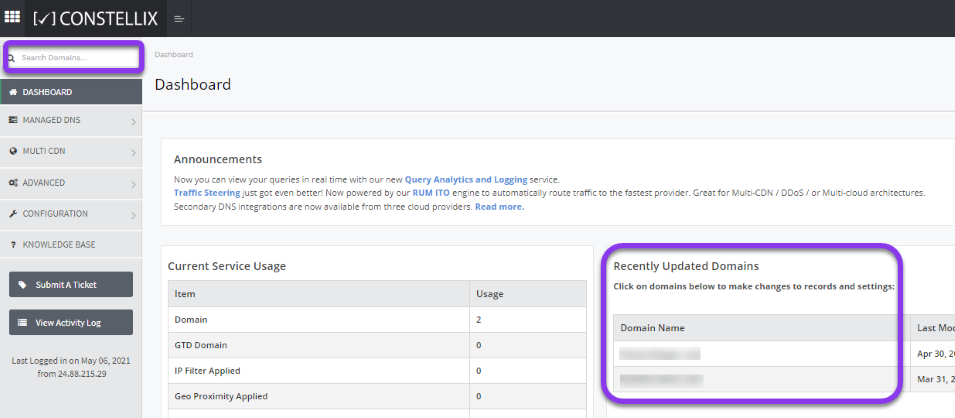
Log into Constellix. Once in the dashboard, select your domain from the Recently Updated Domains list or search for the domain in the top-left search bar.

Note: Options available may vary depending on the current configurations set for your domain.
2. Expand SRV Record Options
After selecting the domain that needs the SRV record, you will be taken to the Records page. If you have not configured any SRV records for this domain yet, click the green + icon beside the SRV record to expand options, otherwise skip to step 3.

3. Add SRV Record
Once options are expanded, click the green + icon to create your SRV record.

4. Enter Record Values
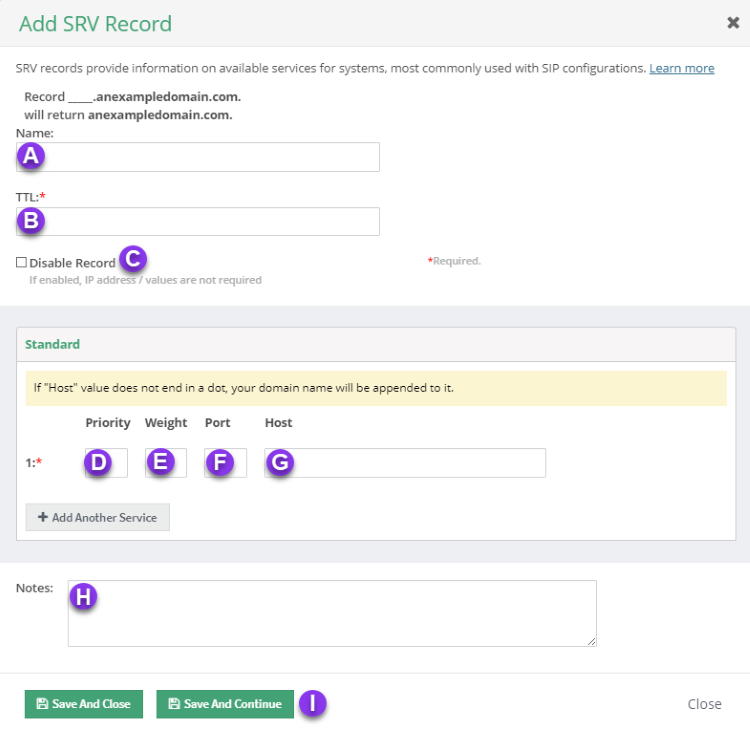
You should now see the Add SRV Record pop-up window.
Fill out the following values:

a) Name: Enter the name of the service using the unique naming convention. Example: _http._tcp.yourdomainnamehere.com
b) TTL: Time to live (measured in seconds) determines how long a record is cached in nameservers.
Visit our What is TTL resource for more information and best practices for TTLs.
Note: We recommend setting TTL values for SRV records between 1800-3600 seconds.
c) Disable Record: With this feature, you are able to remove records from our nameservers without removing the record configuration in the Constellix DNS control panel.
See our Disabling a Record tutorial for more information.
d) Priority: Priorities in SRV records function in the same way as levels in MX Records. The lower the priority value, the higher the preference of the associated target, with 0 being the highest priority possible.
e) Weight: The weight of the SRV record allows an administrator to distribute the load to multiple targets (load balancing). It is used to determine the relative capacity and load between two SRV fields within the same priority. Requests will be assigned proportionately by weight.
Weighted SRV records also allow administrators to balance the load between a powerful and weak server. The server with the lowest weight would have the smallest load. A value of 0 would be the lowest load option.
f) Port: The port of the service offered.
g) Host: Enter the hostname for the mail service.
h) Notes: The note section lets you add important details and keywords so you can easily search for specific records later (optional, but recommended).
i) Save: If you need to add an additional SRV record, tap the green Save and Continue button, otherwise, click on Save and Close.
Note: In order for your SRV record to take effect, you must review and apply changes.
Visit our website for more information on our services and features.

