Knowledge Base
How to Create and Delegate a Subdomain to a 3rd party DNS provider | Constellix | Knowledge Base
Constellix allows you to assign different nameservers to any of your subdomains. This means you will be using two providers simultaneously: one at the root level and one at the subdomain level. This tutorial will walk you through the process.
What is a Subdomain?
A subdomain is an additional part of a primary domain name. Subdomains are the extension that proceeds a domain name. Here is an example: blog.constellix.com. In this case, “blog” is the subdomain and constellix.com is the primary. Creating subdomains let domain owners essentially create new websites under the same domain name.
For this tutorial, we will create the subdomain "subdomain.anexampledomain.com" as an NS record within the anexampledomain.com domain in Constellix and direct the traffic for this subdomain to DNS Made Easy.
Common Use Cases for Third-Party Subdomain Delegation
Delegating subdomains to a third-party provider is useful for testing purposes. For instance, if you wanted to test a provider before moving your entire domain, you could use this method. Subdomain delegation is also beneficial for testing delegation speeds and propagation. Another use case is for bypassing limitations of DNS services provided through registrars or other providers that don’t support ANAME or other certain record types.
Prerequisites
- You have at least one domain with subdomains added to your Constellix account
- You have the necessary nameserver information of the third-party provider
Important: You cannot have a Wildcard record configured when using subdomain delegation as the subdomain you create will be answered by the Wildcard instead of the delegated nameservers.
How to Delegate a Subdomain to a Third-Party Provider in Constellix
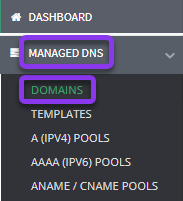
1. Navigate to Managed DNS > Domains
After logging in to the Constellix DNS dashboard, select Managed DNS on the left-hand side menu to expand options and then click Domains.
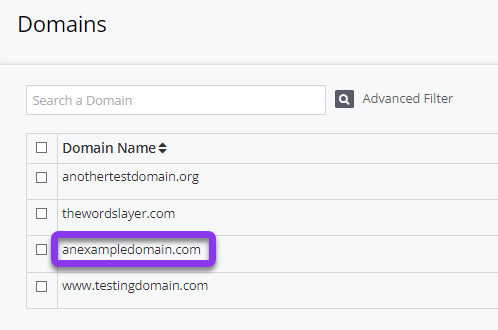
Alternatively, you can select the domain from the Recently Updated Domains list.

2. Choose Domain

3. Add an NS Record
Once on the appropriate domain’s record page, scroll down to the NS records section, then click on the green + icon to add a new NS Record.

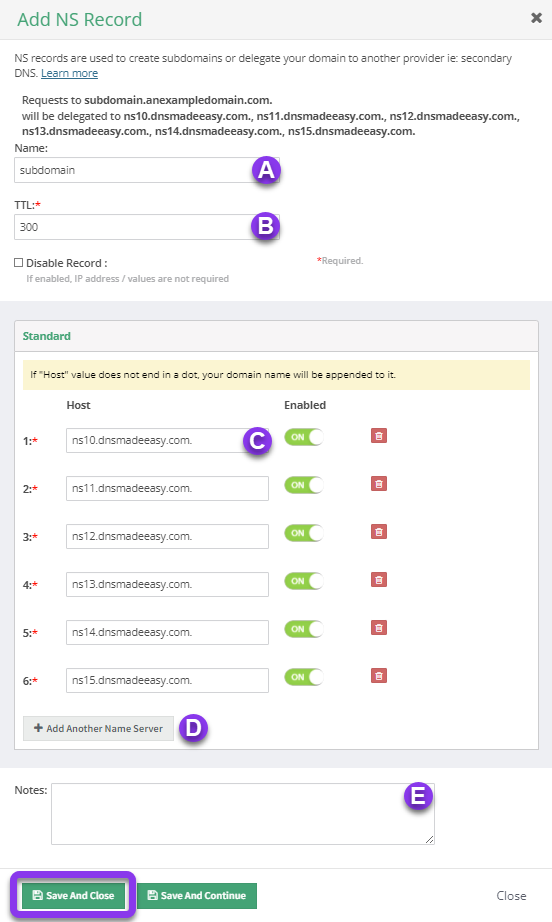
4. Enter NS values
In this step, you will be creating additional NS records that delegate “sub” (name of the subdomain you created) to each of the nameservers it will be assigned to.
The nameservers in the example below are for demonstration purposes only. Please make sure you have the correct nameserver hostnames for your unique configuration.
Important: You must add a dot (.) at the end of the nameserver hostname to prevent your domain name from being appended to the end of it.
a) Name: Enter the name of the subdomain
b) TTL: Configure time to live (TTL) settings (300 seconds by default)
c) Hostname: Enter nameserver hostname(s)
d) Add Nameserver: To add additional hostnames, click the gray + Add Another Name Server button.
e) Notes: Add any relevant notes to this configuration (optional but recommended).
Once you have entered all the necessary details, hit the green Save and Close button.
5. Complete Subdomain Delegation
After saving, you will need to complete the delegation process at the other provider. To do this, you will need to add the subdomain (i.e. subdomain.anexampledomain.com) as a zone. Once added, all records created for that subdomain will be served by the third-party provider (in our example’s case, DNS Made Easy).
Visit our website for more information on our services and features.


