
Knowledge Base
How to Perform Bulk Modifications
This tutorial guides you through the process of making bulk changes to multiple domains at once. Bulk modifications include record updates for any DNS record type, importing or exporting records via domain, template, or AXFR, vanity nameserver changes, and updates to domain settings like Global Traffic Director (GTD) and GeoIP Services.
Common Use Case for Bulk Modifications
Bulk modifications are designed to save time and cut down on errors, and are especially beneficial for MSPs and organizations that manage a large volume of domains that share the same settings and record configurations.
Prerequisites
- At least one domain has been added to your Constellix account
- You have verified that external nameservers allow transfers from the IPs 208.80.120.50 and 208.80.120.51 (Nameserver/AXFR import only)
How to Perform Bulk Modifications in Constellix
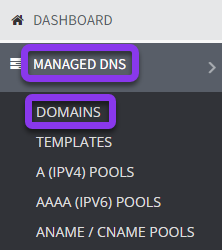
1. Navigate to Managed DNS > Domains
After logging in to the Constellix DNS dashboard, select Managed DNS on the left-hand side menu to expand options and then click Domains.
2. Enter Bulk Modification Dashboard
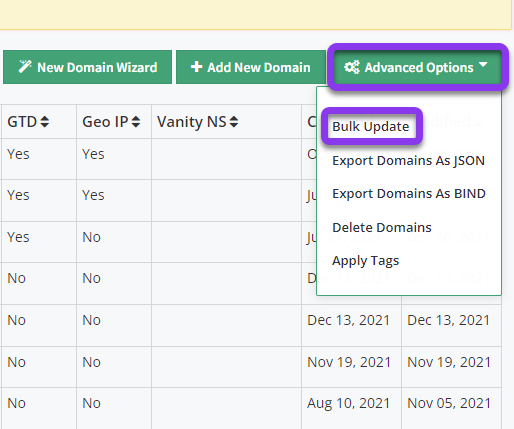
Once in the domains dashboard, click on the green Advanced Settings button on the far right of the screen and then choose Bulk Update from the dropdown menu.
3. Select Domains
Search for domain names individually or enter multiple domain names (separated by commas) into the search box, and then click the green Search button.
Note: You don’t have to enter the full domain name. The search function will pull up any domain that matches the name(s) you enter (as shown in our example).
After clicking Search, your results will appear at the bottom of the page. Select the domains you want to make the changes to by checking the box beside the domain name or by checking the box beside the Domain Name to select all. Next, click the green Select Checked button.
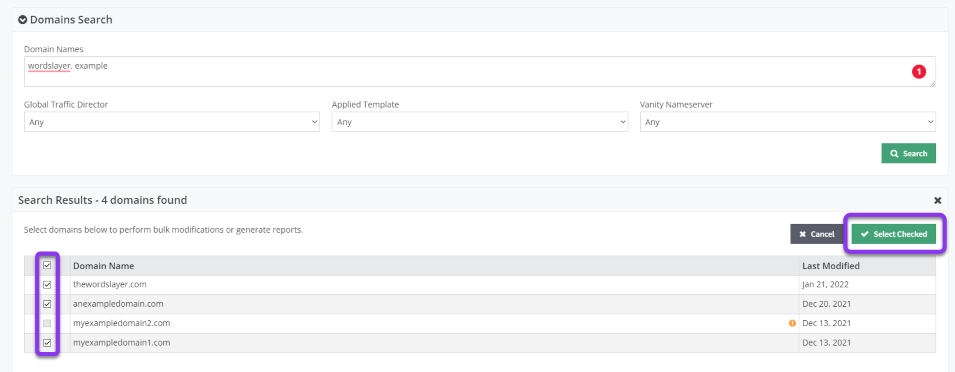
Note: If a domain is unavailable, its checkbox will be grayed out (as in the example above). Hover over the orange exclamation icon for details on why the domain couldn’t be selected.
4. Choose Modifications
In the next screen, you will be presented with several bulk modification options to choose from: records, settings, reporting, import, and SOA. You will also see which domains will be affected by the changes.

a) Records
The records tab is highlighted by default. Before making bulk changes you will need to select from the following options:
Action to Perform:
- New
- Update
- Remove

Select Record Type:
- A
- AAAA
- ANAME
- CNAME
- HTTP Redirection
- MX
- NS
- PTR
- NAPTR
- HINFO
- CAA
- CERT
- RP
- SPF (deprecated - use TXT)
- SRV
- TXT (SPF)
Note: SOA record changes are made on a separate tab (far right).
Once you have chosen the appropriate action and record type, fill in the record information and then click the green Preview button on the right. In this example, we are adding a new AAAA record, but the same process applies to any action or record, though record fields will vary depending on the record type you choose.

After previewing your changes, the name, TTL, and IP/Host field will be grayed out, you will see how many records will be affected, and you have the option to Cancel or Save. If everything is correct, click Save to complete the action.
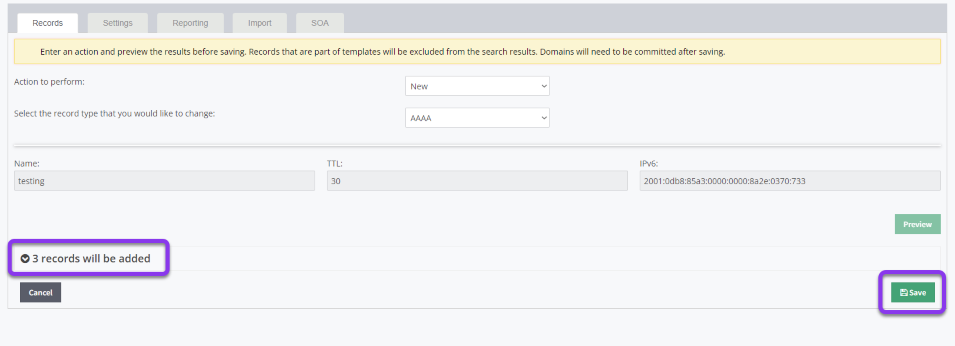
Once saved, you will see a green bar with a message stating the action was a success. You will also see a message at the top of the screen prompting you to review, rollback, or apply changes (changes must be applied/committed before the records will take effect).
b) Settings
The second tab in the bulk changes menu is for settings.
The following options are available:

- Global Traffic Director (GTD)
Choose whether or not you want GTD enabled for your chosen domains. - GeoIP Services
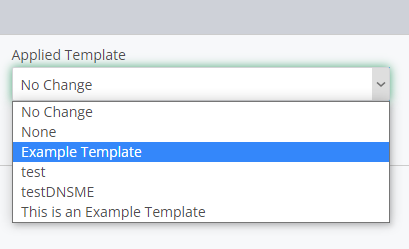
This option allows you to enable GeoIP services for the selected domains (required for services such as Geo Proximity and IP Filters). - Applied Template
To apply or remove a DNS template to/from your selected domains, select the template you want to apply from the dropdown menu. The option None will remove any template currently applied.
Vanity Nameserver
If you are applying a Vanity Nameserver to your domains, choose the appropriate name from the dropdown menu. If you are removing Vanity Nameservers, choose the option None.
Once you have chosen all the setting changes you want for your domains, click the green Save button.

Note: You must commit changes to any domain you are making bulk changes to. If any of your domains are in an uncommitted state, you will receive the following error:
Commit any outstanding changes to complete your bulk modifications.
c) Reporting
At this time, JSON format is the only bulk export option. Click Export to download the zones for all selected domains.

d) Import
The import tab allows you to import records by template, an existing domain in Constellix, or by Nameserver (AXFR) transfer.

Import by Template:
Select your desired template from the dropdown menu and choose whether you want the template to replace the existing records for your selected domains. If you only want to add records from the template, leave the Replace Existing Records box unchecked.
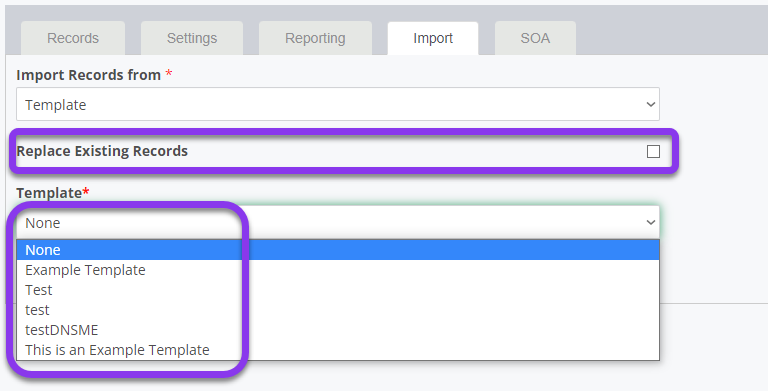
Once you have chosen your template (or none if you are removing templates), click the green Import button.
Import by Domain:
To import records by domain, choose the domain name from the dropdown menu. If you want to replace existing records, check the box beside Replace Existing Records, otherwise leave this box unchecked. Once you have chosen your domain, click the green Import button.

Import by Nameserver (AXFR) Transfer:
This option lets you import records via AXFR. To use this method, select Nameserver (AXFR) in the dropdown list, and then enter the IP address of the nameserver you want to import records from.
Note: When importing via AXFR, all existing records will automatically be replaced, so the option to choose will be grayed out.
Important: The specified nameserver must allow transfers from the IPs 208.80.120.50 and 208.80.120.51 in order to work properly.
Once you have entered the IP address, click the green Import button to complete the action.
e) SOA
The last tab in the bulk modifications menu allows you to make changes to SOA records for multiple domains.
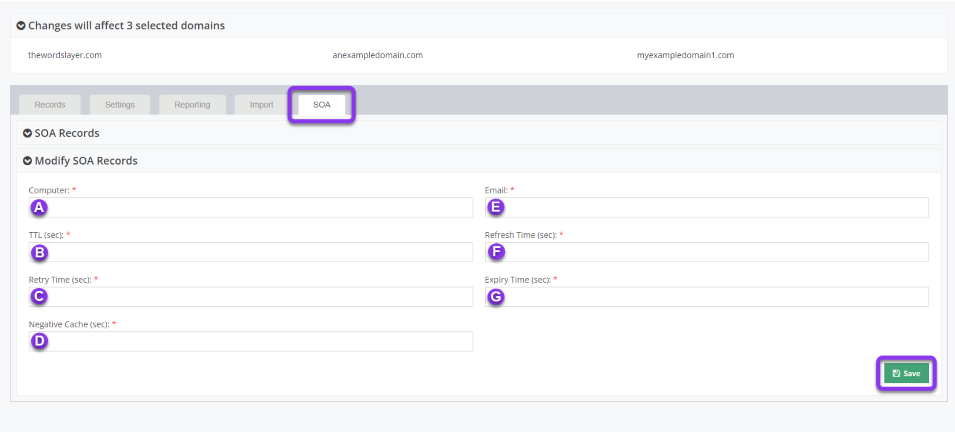
a) Computer: The FQDN of a primary nameserver for this zone.
b) Email: A domain name (FQDN) that specifies the mailbox of the person responsible for this zone.
c) TTL: The number of seconds that this SOA record will be cached in other resolving nameservers. Recommended value – 86400 (24 Hours).
d) Refresh Time: The time interval (in seconds) before the zone should be refreshed. Recommended value – 86400 (24 Hours).
e) Retry Time: The time interval (in seconds) before a failed refresh should be retried. Recommended value – 7200 (2 Hours).
f) Expiry Time: The time interval (in seconds) that specifies the upper limit on the time (internally) that can elapse before the zone is no longer authoritative. This is when the secondary nameservers will expire if they are unable to refresh. Recommended value – up to 2419200 (672 Hours).
g) Negative Cache: The amount of time a record is cached when not found. Times vary depending on your unique needs, but typical settings range between 180 and 172800 (3 min - 2 days).
Once you have entered all your SOA information, click the green Save button.
Visit our website for more information on our services and features.


