Knowledge Base
Configure DNS Failover with Round Robin
What is round-robin?
For an explanation of the round-robin configuration, please visit our tutorial here.
What is DNS Failover?
The DNS Failover service from DNS Made Easy is used to keep sites and web services online in the event of system or network issues. This is done by moving DNS traffic to another IP address that you have running at another location. This service can also be used to migrate traffic between redundant internet connections. A DNS Failover configuration with a round-robin will split traffic evenly between hosts unless one of the hosts is offline in which case it would be removed from the round-robin pool.
Here is how the DNS Failover services work:
DNS Failover services are configured on A records which point to IP addresses. DNS Made Easy’s monitoring nodes check your primary IP address on a 2 to 4-minute monitoring window. You can set up the monitoring servers to check if your service is running on either TCP, UDP, HTTP, or HTTPS protocols, and on any port. As soon as your primary server fails to respond from at least two different geographic monitoring locations, your DNS is instantly updated on all DNS Made Easy name servers globally to point to a secondary IP address as long as it does respond on the same port and protocol configured. You can specify up to 5 IP addresses for each of your hostnames.
When would this be used?
Round Robin with Failover is a very common setup for organizations that uses multiple data centers and wants traffic going to all of them. This configuration would ensure that you can have the traffic spread of Round Robin while also ensuring that if one data center goes down, we will take it out of the rotation of IPs that would come up in a query. This would ensure no downtime for end-users.
1. Navigate to Managed DNS
At the top of the Control Panel, Click the DNS Menu and select Managed DNS from the drop-down.

2. Select your Domain
Select a domain from either the “Recently Updated Domains” box, or start typing the domain name in the textbox on the “Select Domain” tab.

3. Add round-robin A records (if they do not exist already)
If an A record does not already exist for the desired name, then under A Records click the plus sign (+) to add a new A record.

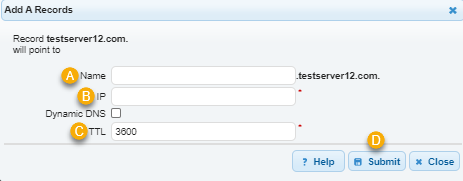
We will add a root record (an A record with the name field left blank) to the domain example.com with an IP address of 1.2.3.4 and a TTL of 180 seconds. If you are adding DNS Failover to an existing A record, then you will want to edit the TTL of this record to set it to a lower value. Records that use DNS Failover services should have a TTL between 180-300 seconds. Click Submit

Now, we will add a second round-robin A record with an IP address of 1.1.1.1 and a TTL of 180 seconds. At this point in the configuration, traffic to example.com is split 50/50 between 1.2.3.4 and 1.1.1.1. Click Submit

4. Add a Contact list (if it does not already exist)
Now we will set up a contact list for notification of the failover event. Select the Config menu, Click on Contact Lists

Click on the plus sign (+) to add a new contact list

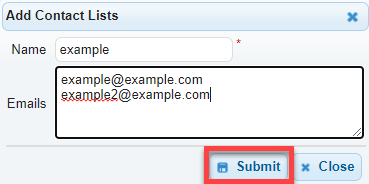
Give the contact list an identifiable name and enter the email address(es) you would like included in the list, one per line. Click Submit Note: Groups are discussed in a separate tutorial here, however, if you are the only user for your account your contact list should be part of the Default group. Otherwise, it should be part of whatever group is set up to have management permissions for the domain.

5. Configure Failover
Now we set up DNS Failover.
Note: The System Monitoring and DNS Failover options configured in this portion of the tutorial are examples only. Each configuration will differ based on monitoring requirements.
Select the DNS Menu, select Managed DNS

Select a domain from either the Recently Updated Domains box or start typing the domain name in the textbox on the Select Domain tab

Under the SM / FO column next to the A record, click off to edit the configuration.

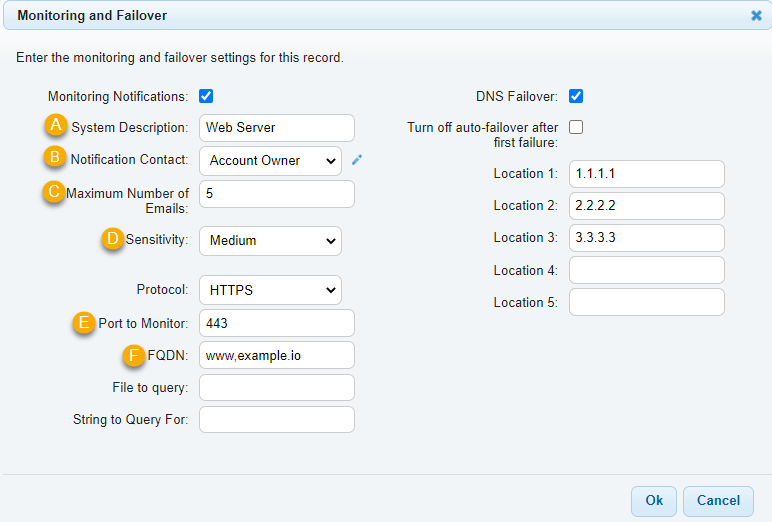
Enable System Monitoring and/or DNS Failover by checking the boxes. These can be used independently of one another if you wish.

- System Description: Once provided, this will be included in the notification you receive so you know which system the notification is for.
- Notification Contact: Select your contact list to be notified of IP statuses or changes – We select the one we created. The default notification is to the Account Owner which is the email address on file for the account (you can view this under the Config – Users menu).
- Maximum Number of Emails: Select an amount you would like to receive regarding each system monitoring and/or failover event.
- Sensitivity: The “sensitivity” option in DNS Failover allows you to specify different numbers of checks the monitoring locations will make against the IP. High Sensitivity means fewer checks, three checks are made in immediate succession of one another to confirm the status of the server. Medium Sensitivity (which is the default) performs six immediate checks. Low Sensitivity performs nine immediate checks. The lower the sensitivity level, the more confirmations the monitoring servers will make.
- Protocol: Configure a port and protocol to monitor based on what criteria you want to confirm is reachable on your server. In the example here we are configuring the primary IP address of 1.1.1.1 to be monitored on HTTP port 80 and failing over to the IP address 2.2.2.2 if the primary is not available.
- FQDN: Enter the fully qualified domain name of the system you are monitoring. This is the full hostname of the monitored system.
- Configure the same settings for the second A record with an IP of 1.2.3.5. We are configuring the primary IP address of 1.2.3.5 to be monitored on HTTP port 80 and failover to the IP address 1.2.3.4 if the primary is not available. Now, if 1.2.3.4 is not available 100% of traffic will be sent to 1.2.3.5, and if 1.2.3.5 is not available 100% of traffic will be sent to 1.2.3.4. If both IP addresses are available traffic will be split 50/50 between 1.2.3.4 and 1.2.3.5.
These are optional:
- We have also added a file and string to query for in the HTTP configuration (this is only example data), these fields are optional with an HTTP or HTTPS configuration. The system will query http://1.2.3.4:80/index.html and look for the string of UP in the first 1KB of text on that page. All these criteria must be met for the IP to be considered online. In addition, the webserver must reply with a 200 response code.
- We have also enabled the “Turn off auto-failover after first failure” feature with a checkmark. This means that DNS Failover will not revert traffic back to the primary IP address automatically. The current IP will remain 1.2.3.5 until it is manually edited it back to 1.2.3.4.
For your information, below is the list of networks our monitoring services will check your primary IP address from:
- 208.94.147.0/24
- 208.94.150.0/24
- 208.94.151.0/24
- 96.45.91.0/24
- 96.45.92.0/24
- 96.45.93.0/24


