
Knowledge Base
Office 365 Setup
If you are an Office 365 customer, you need to add two DNS records to your external DNS host in order for direct workstations to properly authenticate with the correct identity platform. This tutorial walks you through the process.
The record types covered in this tutorial are:
- CNAME
- TXT
- SPF (TXT)
- MX
- SRV
Note: Please refer to Microsoft’s documentation on which records are appropriate for the services you use.
Prerequisites
- You already have a domain added to your DNS Made Easy account
- You are a current Office 365 customer
- You have all the required Office 365 information
How to Setup Office 365 in DNS Made Easy
1. Navigate to Managed DNS
After logging in to the DNS Made Easy dashboard, select Managed DNS from the menu at the top of the page.

2. Select Domain
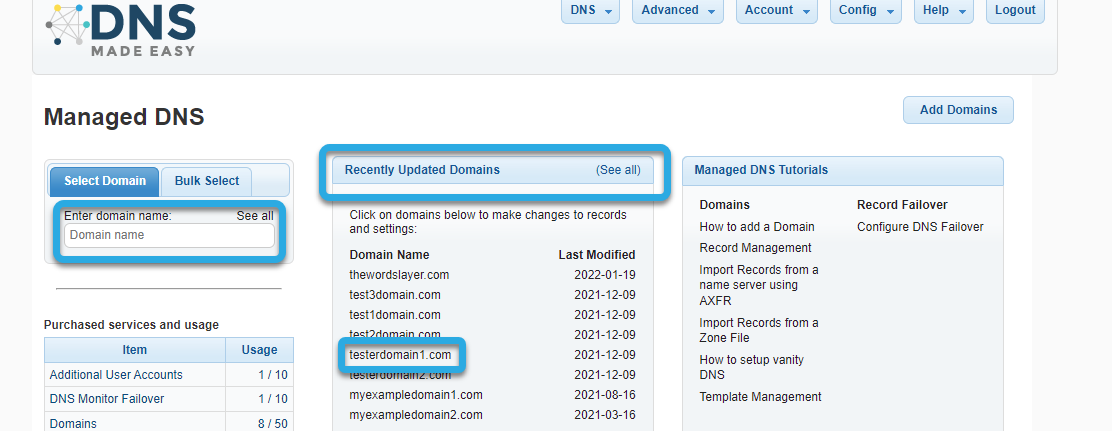
From the Managed DNS page, start typing the name of your domain in the search field on the left-hand side or click on the desired domain name from the Recently Updated Domains list. If the domain you are looking for isn’t showing, click See All.
3. Add TXT Record For Domain Verification
Once on the appropriate domain page, scroll down to the TXT Records (SPF) section and click the blue + icon to create a new TXT record.

In the Add TXT Records (SPF) popup window, add the following values:

- Name: @ (leave blank)
- Value: Enter your verification string. This information can be retrieved via Office 365’s domain setup wizard. The value will look something like this: MS=msXXXXXXXX.
- TTL: Time to Live value for the record. The default value in DNS Made Easy is 1800, but this can be changed according to the needs of your domain.
After clicking submit, you will see a brief success message. Tap Close to finish.

4. Add MX record for Exchange Online
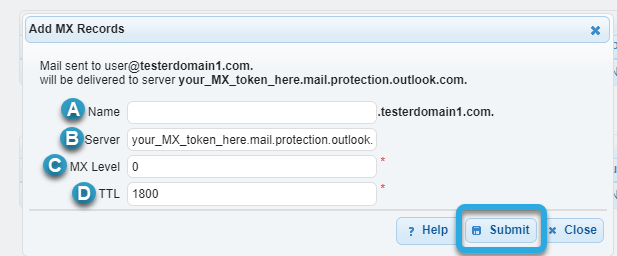
To add an MX record for Exchange Online, scroll to the MX record section and tap the blue + icon to add the record.

Enter the MX record values, which can be found in your Office 365 control panel:
- Name: @ (leave blank)
- Server: In this field, enter your MX token information (your_MX_token_here.mail.protection.outlook.com.)
Important: Be sure to include the dot (.) at the end of the server string.
- MX Level: Choose the priority level for this record. In this case, it should be 0.
- TTL: Enter the appropriate time to live value (the default value in DNS Made Easy is 1800).
Important: Be sure to remove any obsolete MX records that route email to another location.
Upon submission, you will see a success message appear briefly. Click Close to complete the action.

5. Add a CNAME Record for Office 365 (Outlook)
To add a CNAME record, scroll to the CNAME section and click the blue + icon.

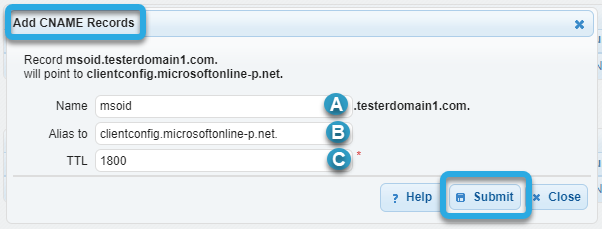
In the Add CNAME Records window, enter the following information and click the blue Submit button once finished:
- Name: In this field, enter the value: autodiscover
- Alias to: Add the alias: autodiscover.outlook.com.
Important: The alias must include a dot at the end (see example).
- TTL: Time to Live value for the record. The default value in DNS Made Easy is 1800, but this can be changed according to the needs of your domain.
6. Add TXT / SPF Records for Office 365
Once on the appropriate domain page, scroll down to the TXT Records (SPF) section and click the blue + icon to create a new TXT record.

In the Add TXT Records popup window, add the following values and then click Submit to complete:
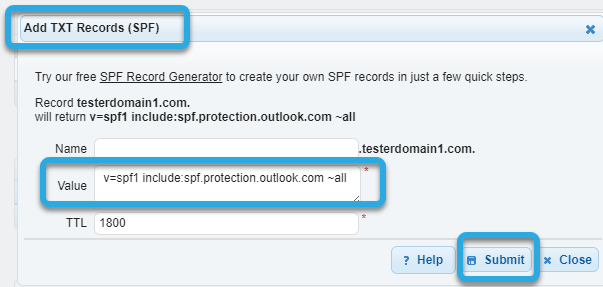
- Name: @ (leave blank)
- Value: Enter your verification string (provided by Office 365). The value will look something like this:
v=spf1 include:spf.protection.outlook.com ~all - TTL: Time to Live value for the record. The default value in DNS Made Easy is 1800, but this can be changed according to the needs of your domain.
Next, duplicate this exact record as an SPF-type record by creating another TXT record. Add the same data for the previous TXT record.
7. Add CNAME Alias for Exchange Federation / Autodiscover Service
To add a CNAME record, scroll to the CNAME section and click the blue + icon.

In the Add CNAME Records window, enter the following information (supplied by Office 365) and click the blue Submit button once finished:
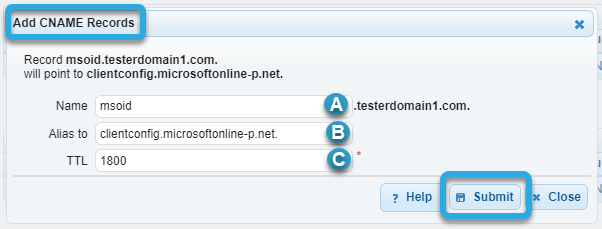
- Name: Enter the value “msoid” without the quotes.
- Alias to: Add the value “clientconfig.microsoftonline-p.net.” without the quotes
Important: Be sure the value in step C ends with the dot.
- TTL: Time to Live value for the record. The default value in DNS Made Easy is 1800, but this can be changed according to the needs of your domain.
8. SRV Records for Lync Online (IM with External Clients via SIP Federation)
If you are using Lync Online to share instant messaging (IM) features with external clients, first you will need to create a new SRV record. To add the SRV Record, scroll to the SRV section and click the blue + icon to add the new record.

In the Add SRV Records window, enter the following information:

Add the data for your record (which you would find in your Office 365 control panel).
- Name: In this field, add the service/protocol. In this case, it would be: _sipfederationtls._tcp
- Priority: Enter the priority of the SRV record, which should be 100.
- Weight: Choose the value for weight, which in this case, should be set to 1.
- Port: Enter the appropriate port. In this instance, it should be 5061.
- Host/Target: sipfed.online.lync.com. (including the trailing dot)
Important: The host/target must end with a dot (see example) or the configuration will not work properly.
- TTL: Enter the time to live value (1800 by default).
Once you have entered all the necessary information, click the blue Submit button to complete the configuration.
9. Additional SRV Records for Lync (Skype for Business/flow of information coordination)
In this step, you will create a second SRV record required to work with Lync Online. Follow the same instructions in step 7 to add the record. In the Add SRV Records window, enter the following values:

- Name: In this field, add the service/ protocol. In this case, it would be: _sip._tls
- Priority: Enter the priority of the SRV record, which should be 100.
- Weight: Choose the value for weight, which in this case, should be set to 1.
- Port: Enter the appropriate port. In this instance, it should be 443.
- Host/Target: In this field, add the host/target: sipdir.online.lync.com.
Important: The host/target must end with a dot (see example), or the configuration will not work properly.
- TTL: Enter the time to live value (1800 by default).
Once you have entered all the necessary information, click the blue Submit button to complete the configuration.
10. Add New CNAME Records for Lync Online.
To add a CNAME record, scroll to the CNAME section and click the blue + icon.

In the Add CNAME Records window, enter the following information (supplied by Office 365) and click the blue Submit button once finished:

- Name: Enter the value “sip” without the quotes.
- Alias to: Add the value: sipdir.online.lync.com.
Important: The Alias must end with a dot (see example), or the configuration will not work properly.
- TTL: Time to Live value for the record. The default value in DNS Made Easy is 1800, but this can be changed according to the needs of your domain.
Once all details are added, click the blue Submit button to finish.
Next, create another new CNAME record by clicking the blue + icon.
In the Add CNAME Records window, add the following values and then click Submit once finished:
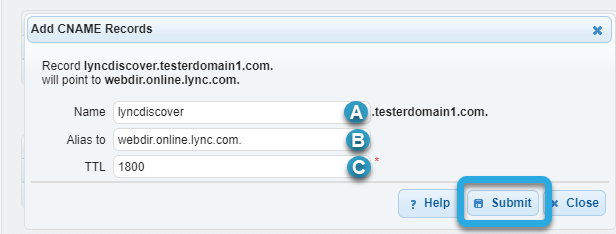
- Name: lyncdiscover
- Alias to: webdir.online.lync.com. (including the trailing dot)
- TTL: Time to Live value for the record. The default value in DNS Made Easy is 1800.
You should now have all the required records configured for Office 365.
Visit our website for more information on our services and features.

