- Contact Us
-

choose your language
-

Knowledge Base
How to Migrate MPKI 8 Certificate profiles to use new DigiCert Public Issuing CAs (Shared or Co-Branded)
Description
DigiCert PKI Platform - How to ‘migrate’ certificate profiles to use new DigiCert Public Issuing CAs (Shared or Co-Branded)
INTRODUCTION
This document describes the actors, pre-requisites and the two main options available to account Administrators to ‘migrate’ from an existing certificate profile configured against a Symantec Public CA hierarchy, to a certificate profile configured against a DigiCert Public Issuing CA hierarchy (whether a Shared Public CA or a Co-branded Public CA):
- Using the “Profile migrate” functionality, or
- Creating a New certificate profile and replicating the configuration settings
Process steps for both options, as well as a more complex configuration use-case (PKI Client auto enrollment), are outlined in detail.
ACTORS
- [SE] DigiCert Systems Engineers & Consultants
- [PKI Ops] DigiCert PKI Operations – DigiCert team responsible for CA Key Ceremonie
- [PKI Admin] Customer PKI Admin – Customer PKI Administrator with certificate to access the PKI Manager portal
- [AD Admin] Customer AD Administrator – Customer Active Directory (AD) Administrator
PRE-REQUISETES
- Account is Active
- For Customers with their own Public Co-branded CA (chaining up to a Symantec Root CA):
- A new CA Naming document needs to be completed and signed (using the new “DigiCert Assured ID Root G2” CA as the issuer). Liaise with your DigiCert customer representative or Systems Engineer/Consultant for support.
- The new Public Co-branded CA needs to be created by the DigiCert PKI Operations team.
- The new Public Co-branded CA must have been loaded onto the Customer’s account.
- For Customers using certificate profiles (e.g. Secure Email) bound to a Symantec Shared CA, wait for the new DigiCert Shared CA to be loaded against all accounts.
New DigiCert PKI Platform Class 2 and Class 3 Shared Public CAs
The following table shows the new DigiCert Class 2 and Class 3 Shared Public CAs available to customers from the 29th of May 2019, the Base Certificate Templates (BCTs) they will be bound to, the account type they will be available on, as well as how they will be made available (on-demand vs automatically):
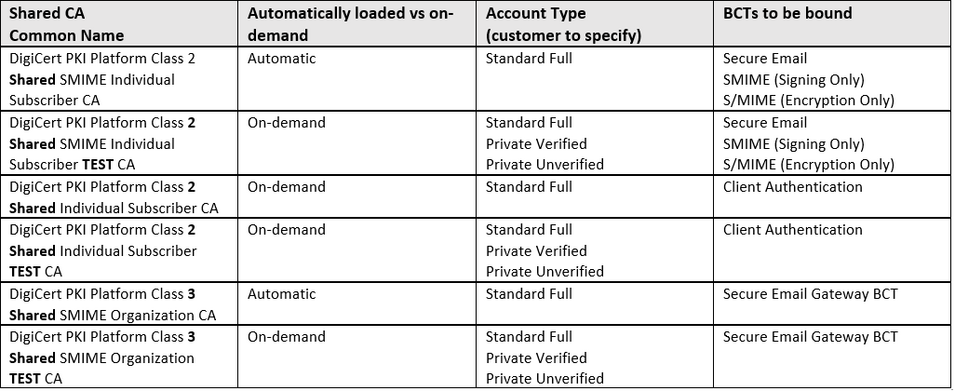
All new Shared CAs will chain up to the “DigiCert Assured ID Root G2” CA:
-----BEGIN CERTIFICATE-----
MIIDljCCAn6gAwIBAgIQC5McOtY5Z+pnI7/Dr5r0SzANBgkqhkiG9w0BAQsFADBl
MQswCQYDVQQGEwJVUzEVMBMGA1UEChMMRGlnaUNlcnQgSW5jMRkwFwYDVQQLExB3
d3cuZGlnaWNlcnQuY29tMSQwIgYDVQQDExtEaWdpQ2VydCBBc3N1cmVkIElEIFJv
b3QgRzIwHhcNMTMwODAxMTIwMDAwWhcNMzgwMTE1MTIwMDAwWjBlMQswCQYDVQQG
EwJVUzEVMBMGA1UEChMMRGlnaUNlcnQgSW5jMRkwFwYDVQQLExB3d3cuZGlnaWNl
cnQuY29tMSQwIgYDVQQDExtEaWdpQ2VydCBBc3N1cmVkIElEIFJvb3QgRzIwggEi
MA0GCSqGSIb3DQEBAQUAA4IBDwAwggEKAoIBAQDZ5ygvUj82ckmIkzTz+GoeMVSA
n61UQbVH35ao1K+ALbkKz3X9iaV9JPrjIgwrvJUXCzO/GU1BBpAAvQxNEP4Htecc
biJVMWWXvdMX0h5i89vqbFCMP4QMls+3ywPgym2hFEwbid3tALBSfK+RbLE4E9Hp
EgjAALAcKxHad3A2m67OeYfcgnDmCXRwVWmvo2ifv922ebPynXApVfSr/5Vh88lA
bx3RvpO704gqu52/clpWcTs/1PPRCv4o76Pu2ZmvA9OPYLfykqGxvYmJHzDNw6Yu
YjOuFgJ3RFrngQo8p0Quebg/BLxcoIfhG69Rjs3sLPr4/m3wOnyqi+RnlTGNAgMB
AAGjQjBAMA8GA1UdEwEB/wQFMAMBAf8wDgYDVR0PAQH/BAQDAgGGMB0GA1UdDgQW
BBTOw0q5mVXyuNtgv6l+vVa1lzan1jANBgkqhkiG9w0BAQsFAAOCAQEAyqVVjOPI
QW5pJ6d1Ee88hjZv0p3GeDgdaZaikmkuOGybfQTUiaWxMTeKySHMq2zNixya1r9I
0jJmwYrA8y8678Dj1JGG0VDjA9tzd29KOVPt3ibHtX2vK0LRdWLjSisCx1BL4Gni
lmwORGYQRI+tBev4eaymG+g3NJ1TyWGqolKvSnAWhsI6yLETcDbYz+70CjTVW0z9
B5yiutkBclzzTcHdDrEcDcRjvq30FPuJ7KJBDkzMyFdA0G4Dqs0MjomZmWzwPDCv
ON9vvKO+KSAnq3T/EyJ43pdSVR6DtVQgA+6uwE9W3jfMw3+qBCe703e4YtsXfJwo
IhNzbM8m9Yop5w==
-----END CERTIFICATE-----

WHAT PROCESS TO FOLLOW?
There are 3 main process flows you can follow in order to start making use of the new DigiCert Public CA hierarchy (whether Public Shared CAs or Public Co-Branded):

USE THE "MIGRATE PROFILE" FUNCTIONALITY
- Login to PKI Manager
- Click on Manage certificate profiles
- Click on a profile that is bound to an existing Symantec Shared CA
- You will now see a new link named “Migrate profile”
(ONLY if the new Shared ICA has been added by PKI Ops following the Re-key process)

- Click on Migrate profile
- On the Migrate profile page, you will be given the option to change the Friendly name of the profile, the Signature algorithm, Key size, and Validity period of the new profile:
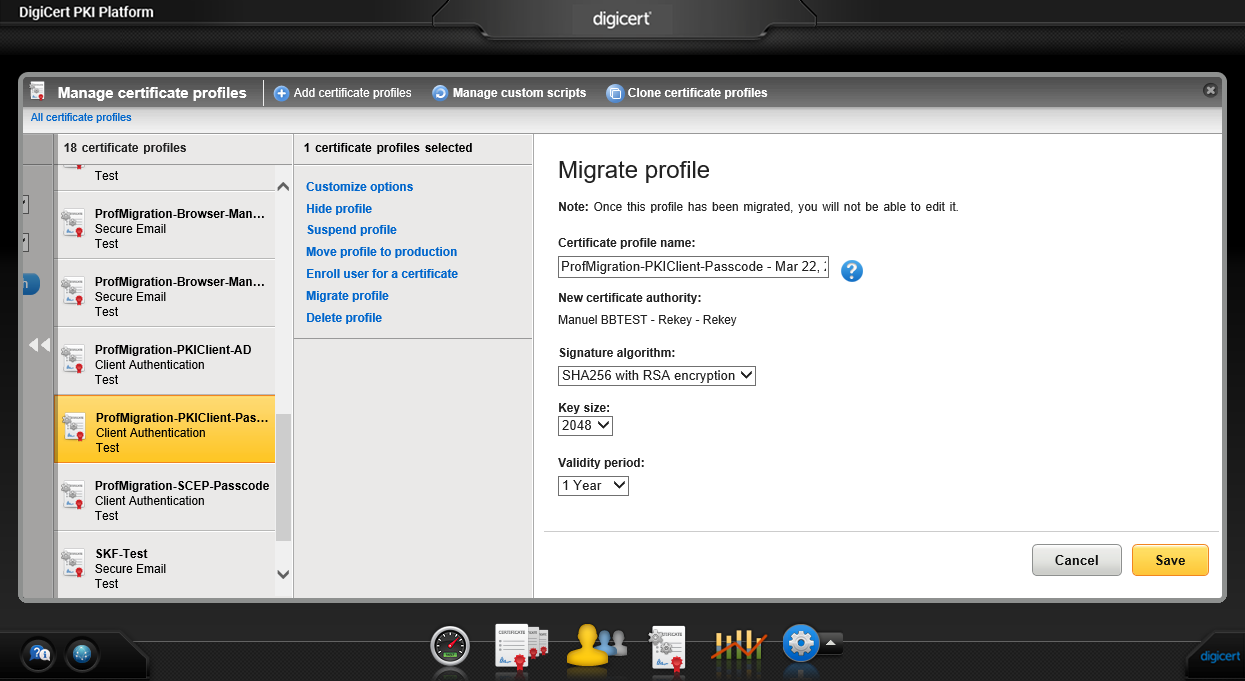
Note: the name of the new DigiCert Shared ICA that will be bound to this new profile is also displayed. - Click Save
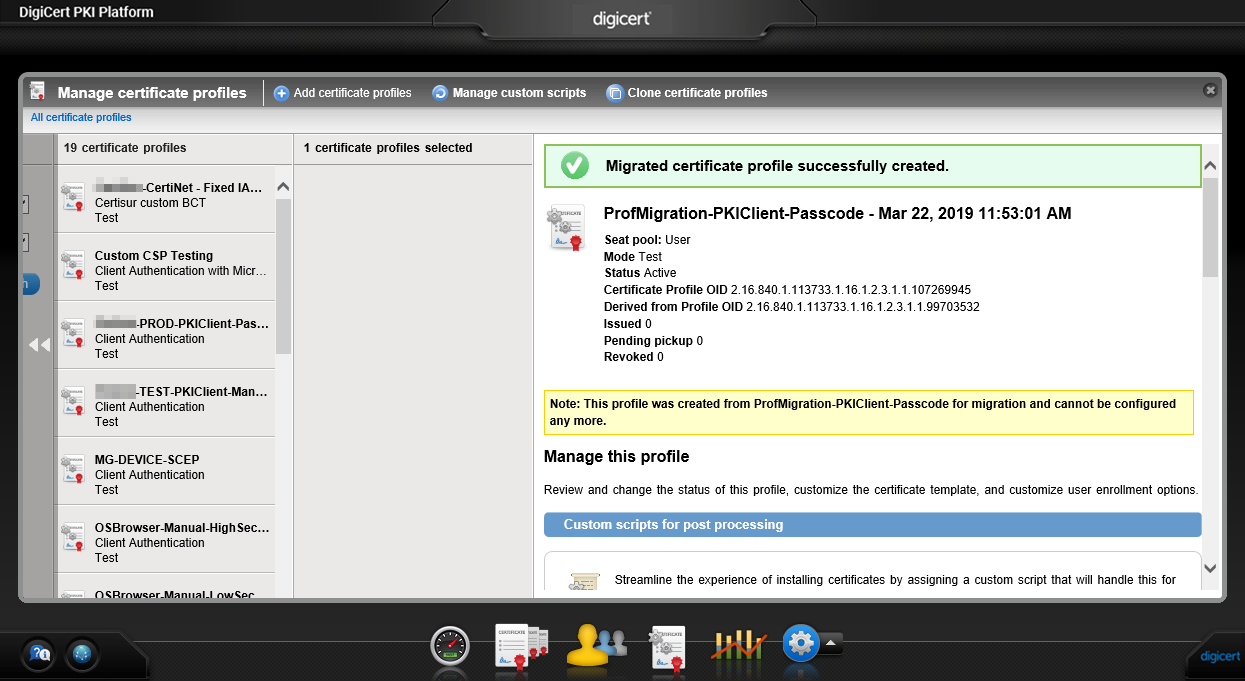
- If successful, the following message will be displayed:

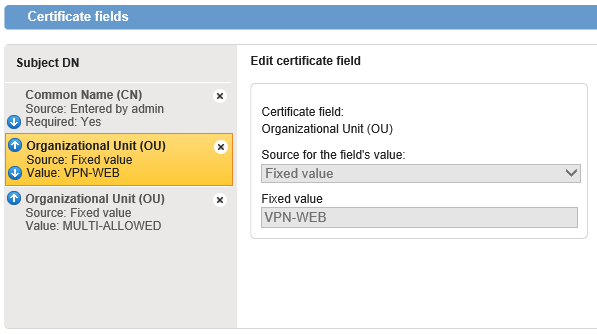
Can’t add and modify fields to the Subject DN:
Can’t modify Seat ID:

Can’t modify email notifications:

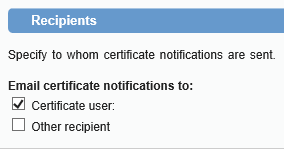
…but can enable/disable sending of email notifications (see “Send email notifications” radio button, to the chosen Recipient:
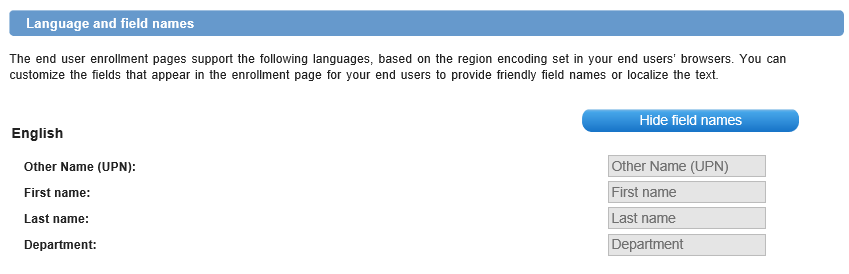
Can’t modify languages and enrolment field names:
- Test the new certificate profile. Note the following rules:
- You cannot enroll or renew against the old migrated profile.
- You cannot modify any of the fields in the new profile, with the exception of specifying the recipient of email notifications (either “Certificate user” or “Other recipient”).
- If you are migrating a profile configured for PKI Client Autoenrollment use-case (using AD as the Authentication method), you must disable email notifications to end users, in case you choose to eventually Delete the profile and automatically revoke all issued certs from it – see details in next section.
- Once successful, you must complete the migration by clicking on the “Complete migrate profile” link:

CONCLUSION: The Profile Migration process facilitates the migration from 1 certificate profile to another, making use of a new CA, minimising the configuration time required, especially if customer has LOTS of customised profiles. However, if any modifications are expected to be done on the new profile, this process should NOT be used - a new certificate profile should be created instead, and all configuration options manually set and tested.
CREATE NEW PROFILE FOR "NON-PKI CLIENT AUTOENROLLMENT" USE-CASE
Use-case: “non-PKI Client Autoenrollment” Enrolment method: OS/Browser, CSR, PKI Client, SCEP, iOS, PKI Web Services Authentication method: Enrollment Code, Manual Approval, Web Services In-premise server component: none |
- Login to PKI Manager
- Create a NEW certificate profile, based on the same BCT, bind it to the new DigiCert Public CA and configure it in the same way as the original one – you may choose to have two browser windows side-by-side showing the PKI Manager portal, to facilitate the task
- Test issuance of a certificate via the appropriate Enrollment method (OS/Browser, CSR, PKI Client, SCEP, iOS, PKI Web Services) and appropriate certificate lifecycle operations</li>
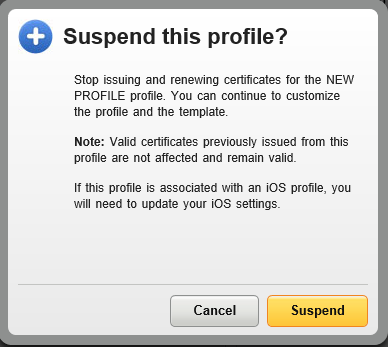
- If end-to-end testing is successful, SUSPEND the OLD cert profile so that no more certs are issued from it:

- Click on the Suspend button:
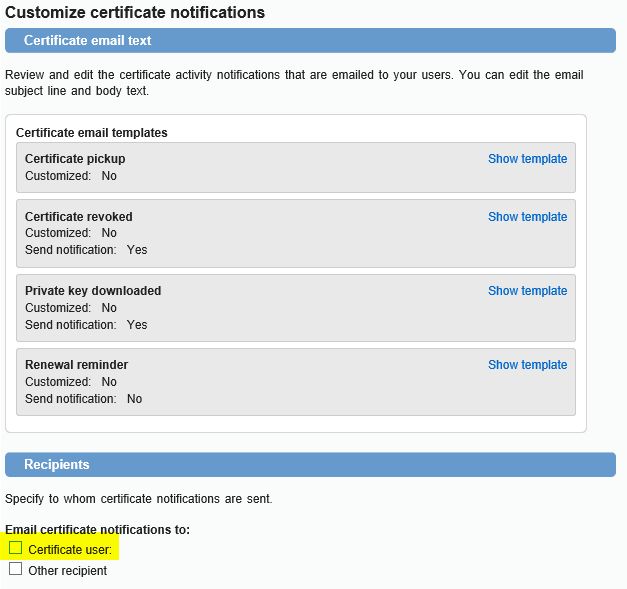
- If configured, modify the Email notification setting for Revoked certificates to NOT send email notifications to Users – this is in case the Admin decides to also DELETE the profile and choose to automatically Revoke all certificates issued from it.
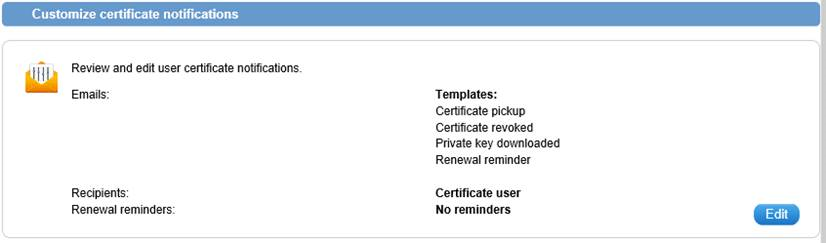
Click on the OLD certificate profile -> under Customize certificate notifications, click Edit -> under Recipients, uncheck the Certificate user check box:
- [OPTIONAL] DELETE the OLD profile by clicking on the Delete profile link and check the “I want to delete this profile and revoke all certificates assigned to it”:

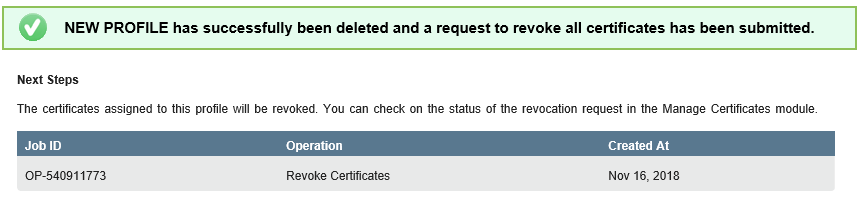
- Click on the Delete Profile button. If successful, you will be presented with a success message showing the Job ID for the bulk revocation asynchronous task, which will run in the background. Once completed, the account Administrator will be notified via email:

CREATE NEW PROFILE FOR "PKI CLIENT AUTOENROLLMENT" USE-CASE
Use-case: “PKI Client Autoenrollment” Enrolment method: PKI Client Authentication method: Active Directory (AD) In-premise server component: PKI Enterprise Gateway (EGW) |
- Login to PKI Manager
- [AD Admin] Create new Test AD Group
- [AD Admin] Add test users to the new Test AD Group
- [PKI Admin] Configure new Authorized User list for new cert profile to use the new Test AD Group. Visit Tasks -> Manage authorized user lists
- [PKI Admin] Click on the Add authorized user list link at the top of the window, enter a friendly name for the list and the TEST AD Group value:}
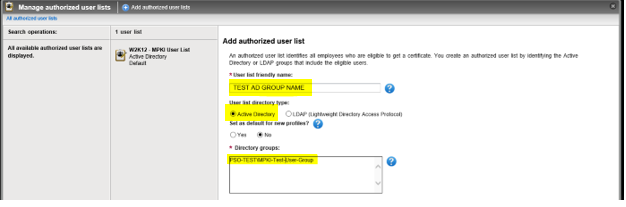
- [PKI Admin] Click the Save button. If successful, you will see a new authorized list created:

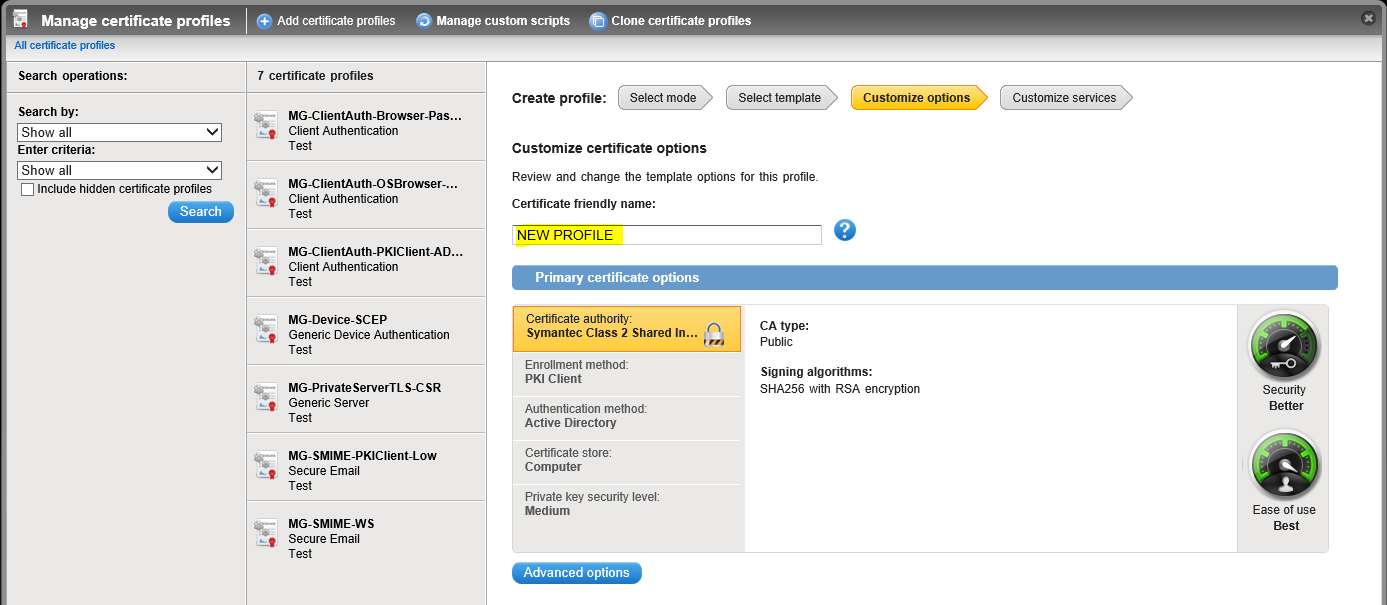
- [PKI Admin] Click on Manage certificate profiles and create a NEW certificate profile by clicking on the Add certificate profiles link at the top of the window, select the Production radio button and the appropriate template.
- [PKI Admin] Enter a new Certificate friendly name and select the NEW CA from the Certificate authority drop-down list (the new DigiCert Public Shared CA or Public Co-branded CA):
- [PKI Admin] Click on the Authentication method and select the newly created authorized user list from the drop-down list:

- [PKI Admin] Set ALL remaining cert profile options as per your OLD profile and click on the Save button once finished.
- [PKI Admin] If you have any Post-Processing scripts set against the OLD profile, check that it has been automatically set against your NEW profile, by locating the Custom scripts for post processing pane on the right-hand side:

- [PKI Admin] Click on the Edit button -> Assign -> Save

- [PKI Admin] If a new script is required, you can upload a new post-processing script by downloading the required script by clicking on the Manage custom scripts located on the top of the window:

- [PKI Admin] Download the required script, change the name and upload it back to the PKI Manager portal.
- [PKI Admin] Click on your NEW profile -> click on Edit, under the Custom scripts for post processing pane on the right-hand side -> Assign -> Save
- [PKI Admin] Check the attribute mapped to Seat ID on the OLD profile matches the one set on the NEW profile, e.g.

- [PKI Admin] If on the OLD profile you customized any of the Email notification templates, replicate the process on the NEW profile:
- [PKI Admin] Check the Administrator contact preference details on the OLD profile match the details on the NEW profile:

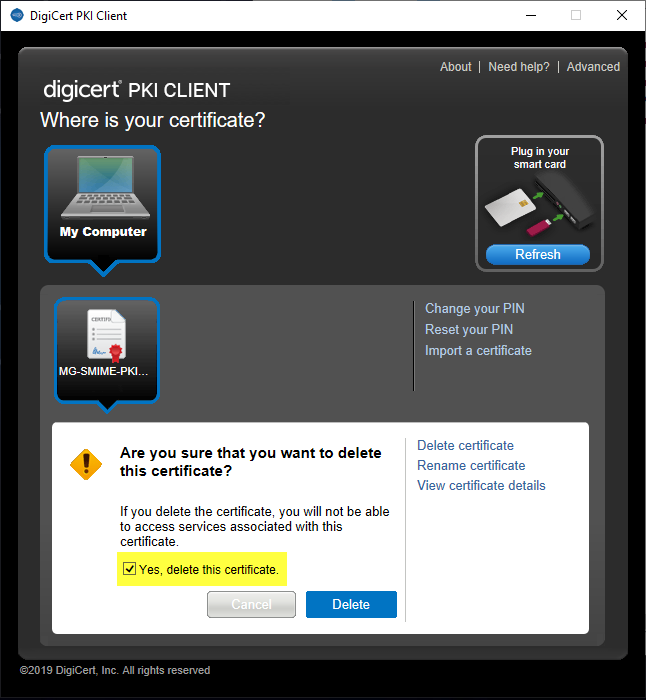
- [Test User] Test issuance of certs via PKI Client using test users belonging to the dedicated Test AD Group. Detailed process steps are available upon request, which include Deleting the test cert from within the PKI Client agent, by launching PKI Client -> clicking on Delete certificate:

- [Test User] Ensure you select the “Yes, delete this certificate” checkbox, and you uncheck the “Allow this certificate to be automatically re-enrolled”, so that PKI Client does not renew the test certificates:
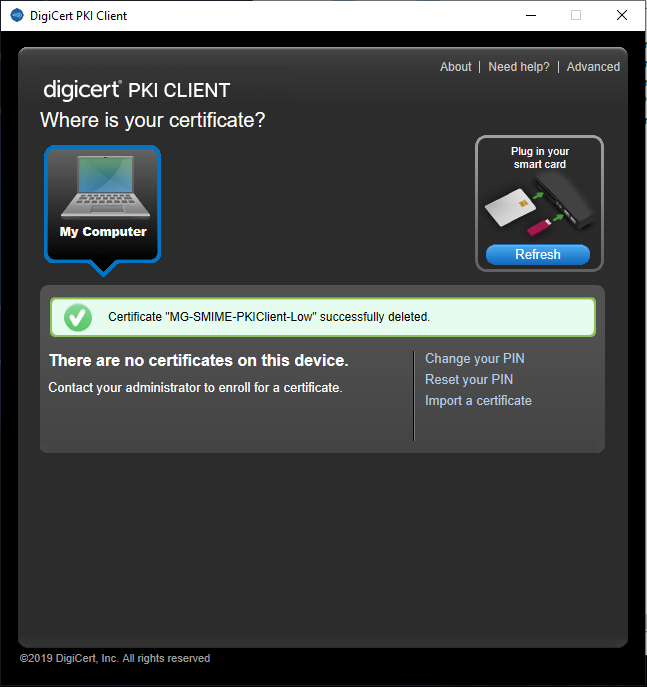
- [Test User] Click the Delete button. If successful, you should get a success message, as follows:
- [PKI Admin] Once tests are successful, SUSPEND the OLD cert profile so that no more certs are issued from it:
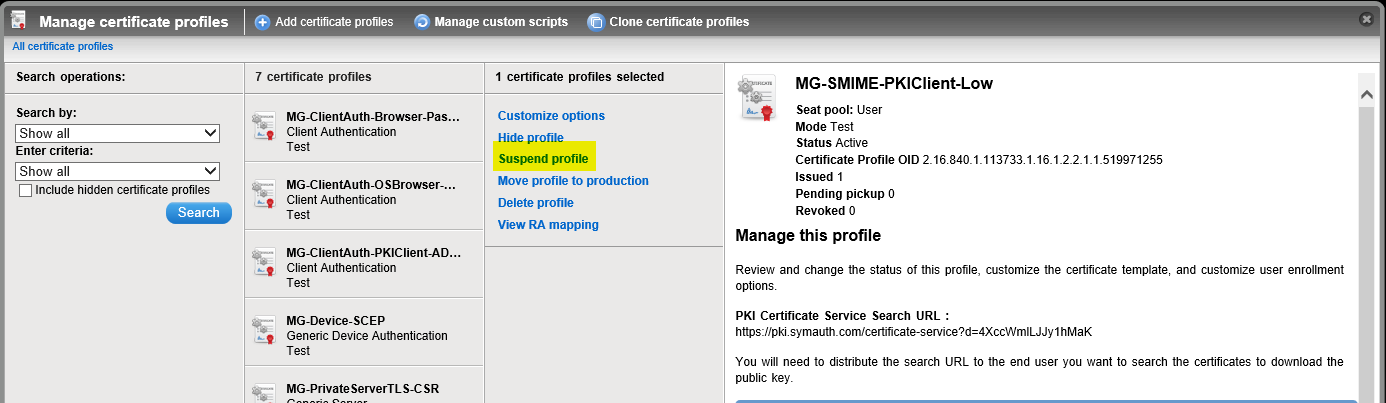
- [PKI Admin] Click on the Suspend button:

- [PKI Admin] Modify the Email notification setting for Revoked certificates to NOT send email notifications to Users. (this is in case the Admin decides to also DELETE the profile and choose to Revoke all certs). Click on the OLD certificate profile -> under Customize certificate notifications, click Edit -> under Recipients, and uncheck the Certificate user check box:

- [PKI Admin – OPTIONAL] DELETE the OLD profile by clicking on the Delete profile link and check the “I want to delete this profile and revoke all certificates assigned to it”:
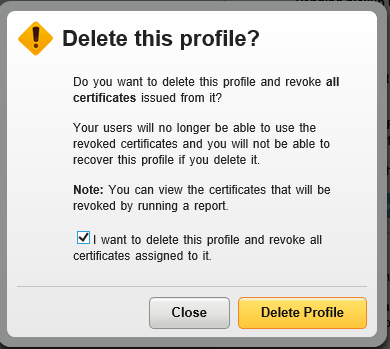
- Click on the Delete Profile button. If successful, you will be presented with a success message showing the Job ID for the bulk revocation asynchronous task, which will run in the background. Once completed, you will be notified via email:
- [PKI Admin] Go live with the NEW cert profile, i.e. associate the full Prod AD User Group to the NEW cert profile (simply copy details from OLD authorized user list)
-

The most-trusted global provider of high-assurance TLS/SSL, PKI, IoT and signing solutions.
-


-
© 2022-2025, DigiCert, Inc. All rights reserved.
Cookie Settings
