
Knowledge Base
Creating a CSR and install your SSL certificate on your Windows server 2016
Use the instructions on this page to use IIS 10 to create your certificate signing request (CSR) and install your SSL certificate on your Windows Server 2016.
- To create your certificate signing request (CSR), see IIS 10: How to Create Your CSR on Windows Server 2016.
- To install your SSL certificate, see IIS 10: How to Install and Configure Your SSL Certificate on Windows Server 2016.
If you are looking for a simpler way to create CSRs and install and manage your SSL Certificates, we recommend using the DigiCert® Certificate Utility for Windows. You can use the DigiCert Utility to generate your CSR and install your SSL certificate.
See: Windows Server 2016: Create CSR & Install SSL Certificate with DigiCert Utility.
IIS 10: How to Create Your CSR on Windows Server 2016
Using IIS 10 to Create Your CSR
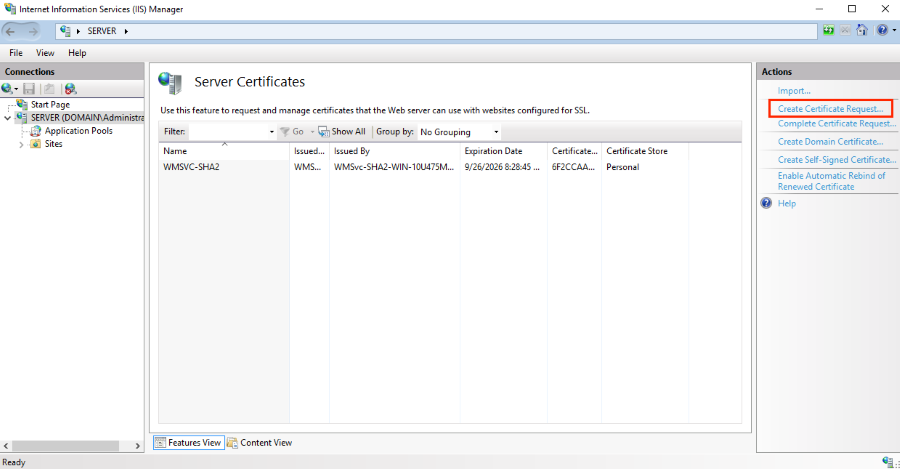
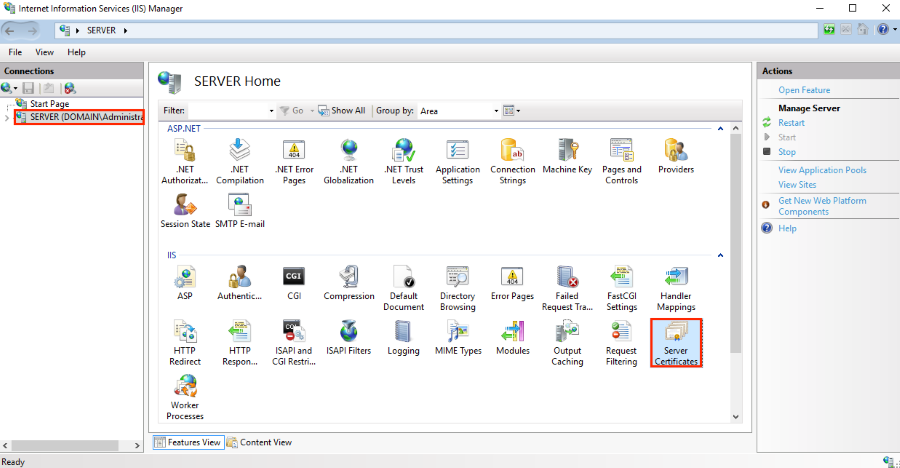
- In the Windows start menu, type Internet Information Services (IIS) Manager and open it.
- In Internet Information Services (IIS) Manager, in the Connections menu tree (left pane), locate and click the server name.

- On the server name Home page (center pane), in the IIS section, double-click Server Certificates.
- On the Server Certificates page (center pane), in the Actions menu (right pane), click the Create Certificate Request link.
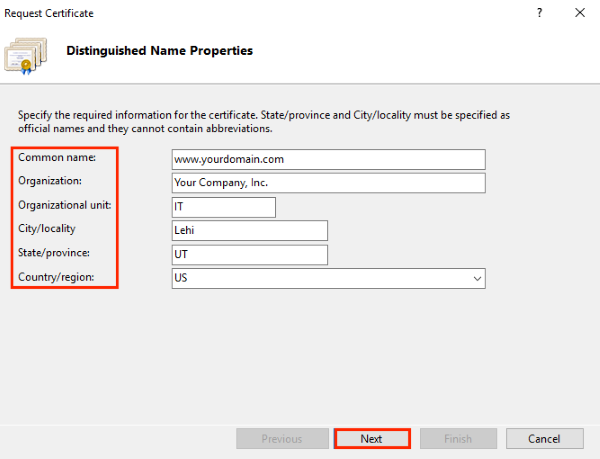
- In the Request Certificate wizard, on the Distinguished Name Properties page, provide the information specified below and then click Next.
Common name: Type the fully-qualified domain name (FQDN) (e.g., www.example.com).
Organization: Type your company's legally registered name (e.g., YourCompany, Inc.).
Organizational unit: The name of your department within the organization. Frequently this entry will be listed as "IT", "Web Security,"or is simply left blank.
City/locality: Type the city where your company is legally located.
State/province: Type the state/province where your company is legally located.
Country: In the drop-down list, select the country where your company is legally located.
- On the Cryptographic Service Provider Properties page, provide the information below and then click Next.
Cryptographic service provider: In the drop-down list, select Microsoft RSA SChannel Cryptographic Provider, unless you have a specific cryptographic provider.
Bit length: In the drop-down list select 2048, unless you have a specific reason for opting for larger bit length.

- On the File Name page, under Specify a file name for the certificate request, click the … box to browse to a location where you want to save your CSR.
Note: Remember the filename that you choose and the location to which you save your csr.txt file. If you just enter a filename without browsing to a location, your CSR will end up in C:\Windows\System32.
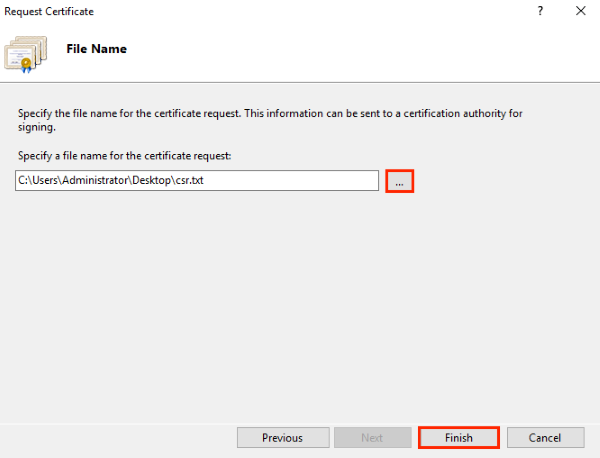
- When you are done, click Finish.
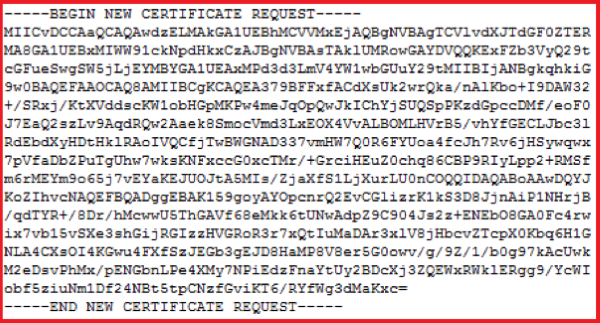
- Use a text editor (such as Notepad) to open the file. Then, copy the text, including the -----BEGIN NEW CERTIFICATE REQUEST----- and -----END NEW CERTIFICATE REQUEST----- tags, and paste it into the DigiCert order form.
- After you receive your SSL certificate from DigiCert, you can install it.
IIS 10: How to Install and Configure Your SSL Certificate on Windows Server 2016
If you have not yet created a CSR and ordered your certificate, see IIS 10: How to Create Your CSR Windows Server 2016.
After we validate and issue your SSL certificate, you need to install it on the Windows 2016 server where the CSR was generated. Then, you need to configure the server to use it.
- (Single Certificate) How to install and configure your SSL certificate
- (Multiple Certificates) How to install and configure your SSL certificates using SNI
(Single Certificate) How to install your SSL certificate and configure the server to use it
Installing your SSL Certificate
- On the server where you created the CSR, save the SSL certificate .cer file (e.g., your_domain_com.cer) that DigiCert sent to you.
- In the Windows start menu, type Internet Information Services (IIS) Manager and open it.
- In Internet Information Services (IIS) Manager, in the Connections menu tree (left pane), locate and click the server name.
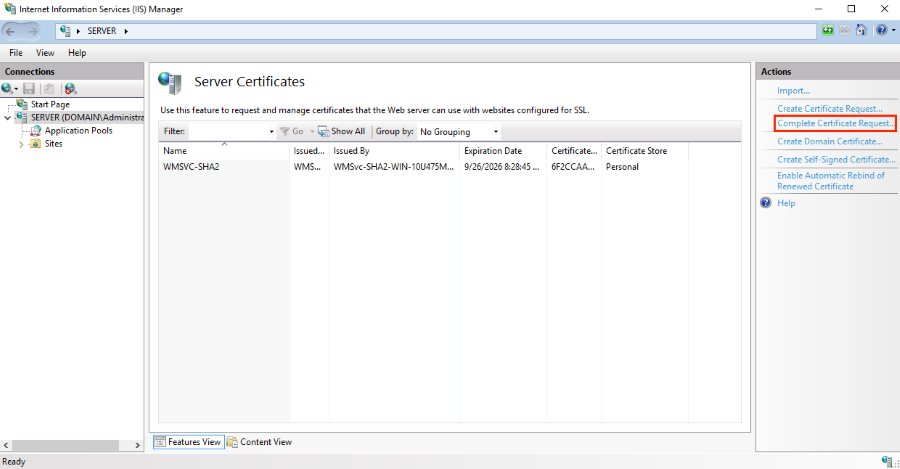
- On the server name Home page (center pane), in the IIS section, double-click Server Certificates.
- On the Server Certificates page (center pane), in the Actions menu (right pane), click the Complete Certificate Request link.

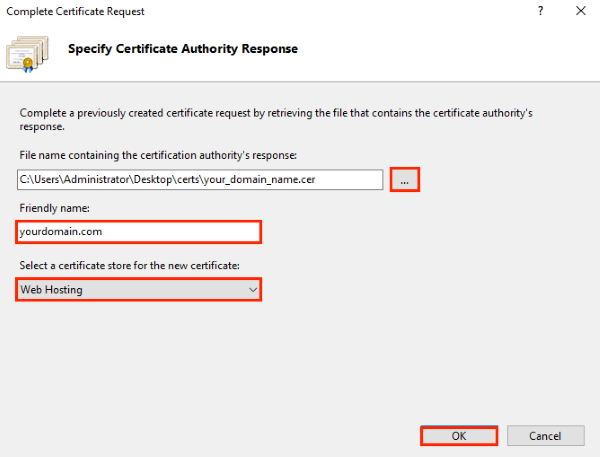
- In the Complete Certificate Request wizard, on the Specify Certificate Authority Response page, do the following and then click OK.
File name containing the certificate authority's response: Click the … box and browse to and select the .cer file (e.g., your_domain_com.cer) that DigiCert sent to you.
Friendly name: Type a friendly name for the certificate.
The friendly name is not part of the certificate; instead, it is used to identify the certificate. We recommend that you add DigiCert and the expiration date to the end of your friendly name, for example: yoursite-digicert-(expiration date). This information helps identify the issuer and expiration date for each certificate. It also helps distinguish multiple certificates with the same domain name.
Select a certificate store for the new certificate: In the drop-down list, select Web Hosting.
- Now that you've successfully installed your SSL certificate, you need to assign the certificate to the appropriate site.
Assigning your SSL Certificate
- In Internet Information Services (IIS) Manager, in the Connections menu tree (left pane), expand the name of the server on which the certificate was installed. Then expand Sites and click the site you want to use the SSL certificate to secure.
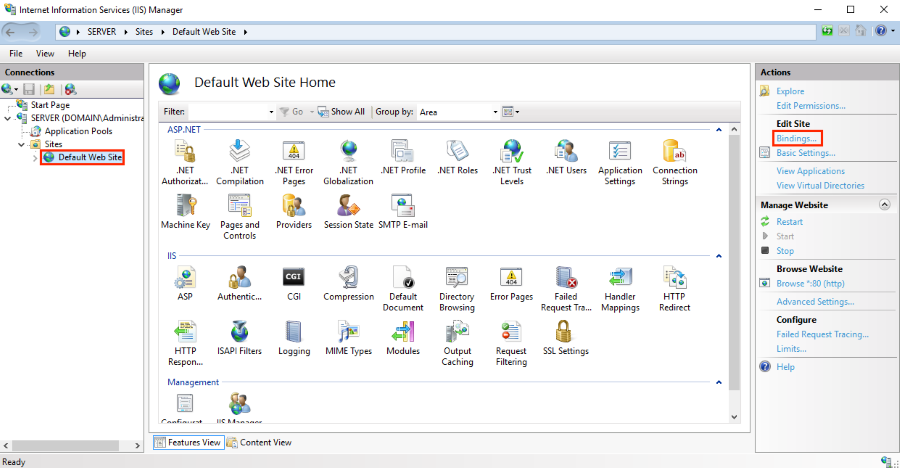
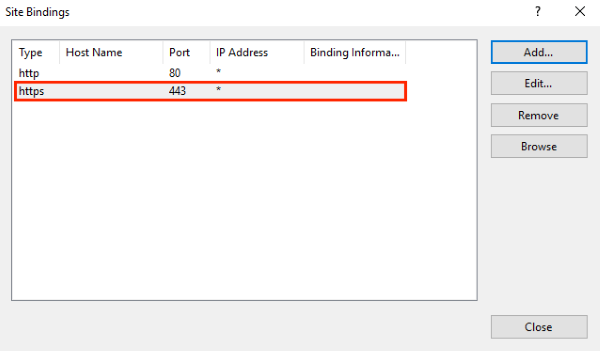
- On the website Home page, in the Actions menu (right pane), under Edit Site, click the Bindings link.
- In the Site Bindings window, click Add.
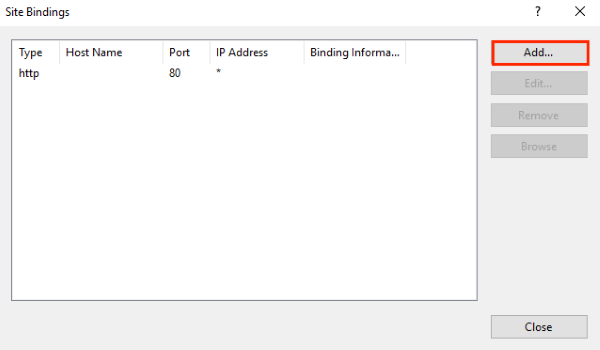
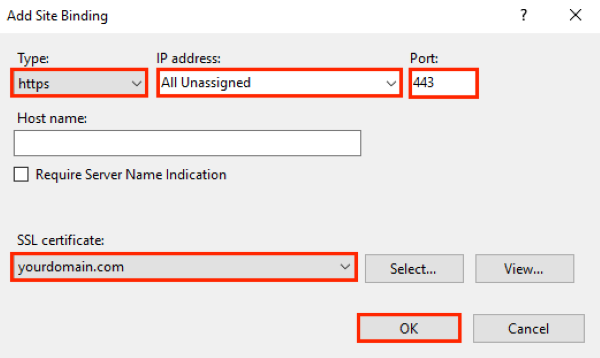
- In the Add Site Bindings window, do the following and then click OK.
Type: In the drop-down list, select https.
IP address: In the drop-down list, select the IP address of the site or select All Unassigned.
Port: Type port 443. The port over which traffic is secure by SSL is port 443.
SSL certificate: In the drop-down list, select your new SSL certificate (e.g., yourdomain.com).

- Your SSL certificate is now installed, and the website configured to accept secure connections.
(Multiple Certificates) How to install your SSL certificates and configure the server to use them using SNI
These instructions explain how to install multiple SSL certificates and assign them using SNI.
The process is split into two parts as follows:
- Installing and Configuring Your First SSL Certificate
- Installing and Configuring All Additional Certificates
Installing your First SSL Certificate
Apply this first set of instructions only once, for the first SSL certificate.
- On the server where you created the CSR, save the SSL certificate .cer file (e.g., your_domain_com.cer) that DigiCert sent to you.
- In the Windows start menu, type Internet Information Services (IIS) Manager and open it.
- In Internet Information Services (IIS) Manager, in the Connections menu tree (left pane), locate and click the server name.

- On the server name Home page (center pane), in the IIS section, double-click Server Certificates.
- On the Server Certificates page (center pane), in the Actions menu (right pane), click the Complete Certificate Request link.
- In the Complete Certificate Request wizard, on the Specify Certificate Authority Response page, do the following and then click OK.
File name containing the certificate authority's response: Click the … box and browse to and select the .cer file (e.g., your_domain_com.cer) that DigiCert sent to you.
Friendly name: Type a friendly name for the certificate. The friendly name is not part of the certificate; instead, it is used to identify the certificate. We recommend that you add DigiCert and the expiration date to the end of your friendly name, for example: yoursite-digicert-(expiration date). This information helps identify the issuer and expiration date for each certificate. It also helps distinguish multiple certificates with the same domain name.
Select a certificate store for the new certificate: In the drop-down list, select Web Hosting.

- Now that you've successfully installed your SSL certificate, you need to assign the certificate to the appropriate site.
- In Internet Information Services (IIS) Manager, in the Connections menu tree (left pane), expand the name of the server on which the certificate was installed. Then expand Sites and click the site you want to use the SSL certificate to secure.

- On the website Home page, in the Actions menu (right pane), under Edit Site, click the Bindings link.
- In the Site Bindings window, click Add.

- In the Add Site Bindings window, do the following and then click OK.
Type: In the drop-down list, select https.
IP address: In the drop-down list, select the IP address of the site or select All Unassigned.
Port: Type port 443. The port over which traffic is secure by SSL is port 443.
SSL certificate: In the drop-down list, select your new SSL certificate (e.g., yourdomain.com).
- Your first SSL certificate is now installed, and the website configured to accept secure connections.
Installing Additional SSL Certificates
To install and assign each additional SSL certificate, repeat the steps below, as needed.
- On the server where you created the CSR, save the SSL certificate .cer file (e.g., your_domain_com.cer) that DigiCert sent to you.
- In the Windows start menu, type Internet Information Services (IIS) Manager and open it.
- In Internet Information Services (IIS) Manager, in the Connections menu tree (left pane), locate and click the server name.

- On the server name Home page (center pane), in the IIS section, double-click Server Certificates.
- On the Server Certificates page (center pane), in the Actions menu (right pane), click the Complete Certificate Request link.

- In the Complete Certificate Request wizard, on the Specify Certificate Authority Response page, do the following and then click OK.
File name containing the certificate authority's response: Click the … box and browse to and select the .cer file (e.g., your_domain_com.cer) that DigiCert sent to you.
Friendly name: Type a friendly name for the certificate. The friendly name is not part of the certificate; instead, it is used to identify the certificate. We recommend that you add DigiCert and the expiration date to the end of your friendly name, for example: yoursite-digicert-(expiration date). This information helps identify the issuer and expiration date for each certificate. It also helps distinguish multiple certificates with the same domain name.
Select a certificate store for the new certificate: In the drop-down list, select Web Hosting.

- Now that you've successfully installed your SSL certificate, you need to assign the certificate to the appropriate site.
- In Internet Information Services (IIS) Manager, in the Connections menu tree (left pane), expand the name of the server on which the certificate was installed. Then expand Sites and click the site you want to use the SSL certificate to secure.

- On the website Home page, in the Actions menu (right pane), under Edit Site, click the Bindings link.
- In the Site Bindings window, click Add.

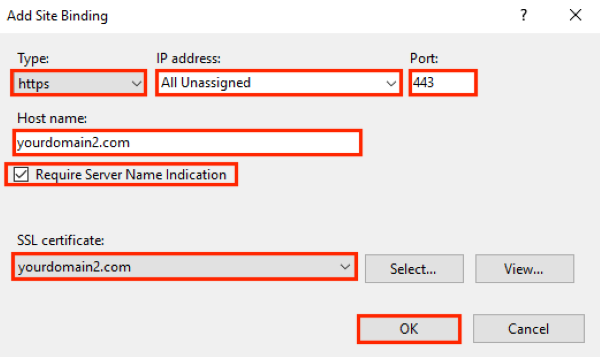
- In the Add Site Bindings window, do the following and then click OK.
Type: In the drop-down list, select https.
IP address: In the drop-down list, select the IP address of the site or select All Unassigned.
Port: Type port 443. The port over which traffic is secure by SSL is port 443.
Host name: Type the host name that you want to secure.
Require Server Name Indication: After you enter the host name, check this box. This is required for all additional certificates/sites, after you've installed the first certificate and secured the primary site.
SSL certificate: In the drop-down list, select an additional SSL certificate (e.g., yourdomain2.com).
- You have successfully installed another SSL certificate and configured the website to accept secure connections.
Test Installation
If your website is publicly accessible, our DigiCert® SSL Installation Diagnostic Tool can help you diagnose common problems.
-

The most-trusted global provider of high-assurance TLS/SSL, PKI, IoT and signing solutions.
-


-
© 2022-2026, DigiCert, Inc. All rights reserved.
Cookie Settings
