- Contact Us
-

choose your language
-

Knowledge Base
Google App Engine | SSL Certificate Installation
If you have not yet created a Certificate Signing Request (CSR) and ordered your certificate, see Google App Engine: SSL Certificate CSR Creation.
Google App Engine: Installing Your SSL Certificate
To install your Google App Engine SSL Certificate, complete the steps below.
Import your SSL Certificate to your Windows server or workstation using the DigiCert® Certificate Utility for Windows.
Importing an SSL Certificate Using the DigiCert Certificate Utility
Export the SSL Certificate in Apache-compatible .pem format (separate .key and .crt files) using the DigiCert® Certificate Utility for Windows.
Exporting an SSL Certificate in Apache Compatible Format Using the DigiCert Certificate Utility
Append the Intermediate Certificate to the end of the SSL Certificate file.
Appending the Intermediate Certificate to Your SSL Certificate File
Upload and configure your SSL Certificate using the Google Admin console.
Google App Engine: Uploading and Configuring Your SSL Certificate
Importing an SSL Certificate Using the DigiCert Certificate Utility
After we validate and issue your SSL Certificate, you can use the DigiCert® Certificate Utility for Windows to import the file to your Microsoft server or workstation.
On the server or workstation where you created the CSR, save the SSL Certificate .cer file (e.g., your_domain_com.cer) that DigiCert sent you.
Run the DigiCert® Certificate Utility for Windows.
Double-click DigiCertUtil.
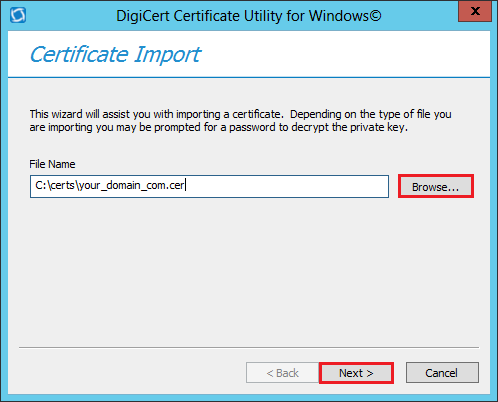
In DigiCert Certificate Utility for Windows©, click SSL (gold lock) and click Import.

In the Certificate Import window, under File Name, click Browse to browse to the .cer (i.e., your_domain_com.cer) certificate file that DigiCert sent you, select the file, click Open, and click Next.
In the Enter a new friendly name or you can accept the default box, enter a friendly name for the certificate. The friendly name is not part of the certificate; instead, it is used to identify the certificate.
We recommend that you add DigiCert and the expiration date to the end of your friendly name, for example: yoursite-DigiCert-expirationDate. This information helps identify the issuer and expiration date for each certificate. It also helps distinguish multiple certificates with the same domain name.
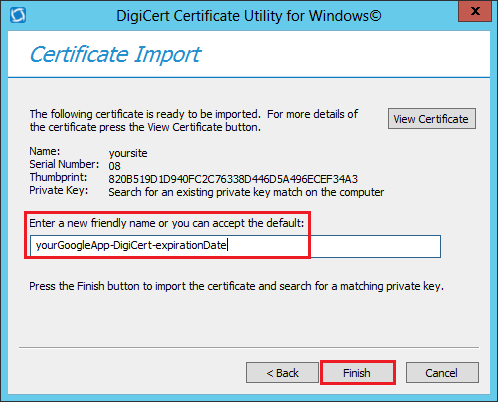
Click Finish.
Exporting an SSL Certificate in Apache Compatible .pem Format Using the DigiCert Certificate Utility
To make an SSL connection, your server needs two parts: a private key file and a certificate file. Apache (and many other server types) separate these two certificate parts into separate .key files and .crt files (both files are .pem formatted files).
Run the DigiCert® Certificate Utility for Windows.
Double-click DigiCertUtil.
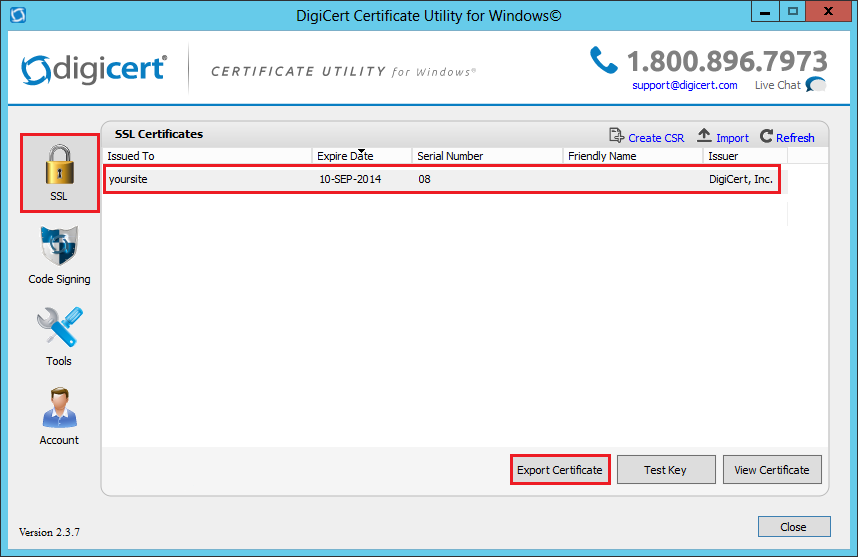
In DigiCert Certificate Utility for Windows©, click SSL (gold lock), select the SSL Certificate you want to export, and click Export Certificate.
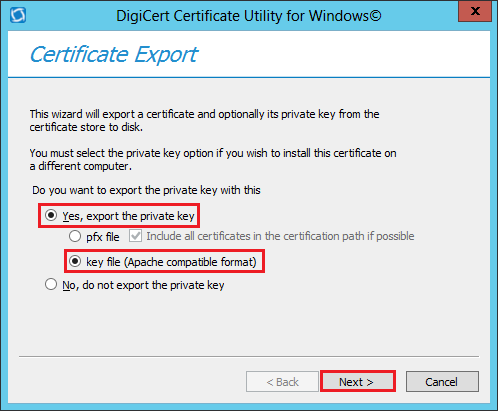
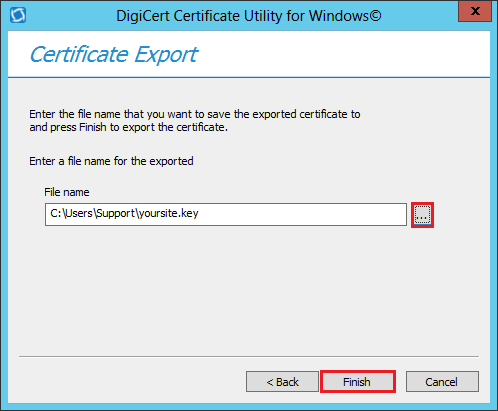
In the Certificate Export wizard, select Yes, export the private key, select key file (Apache compatible format), and click Next.
In the File name box, click … to browse for and select the location and file name where you want to save the certificate .crt and .key files, and click Finish.
This creates the following files that you will need to upload and configure using your Google Admin console.
- Private Key: your_domain_com.key
- Server Certificate: your_domain_com.crt
- Intermediate Certificate: DigiCertCA.crt
Note: The .key and .crt files are in .pem format; they are just named with .key and .crt.
After you receive the "Your certificate and key have been successfully exported" message, click OK.
Appending the Intermediate Certificate to Your SSL Certificate
SSL .pem files (concatenated certificate container files), are frequently required for certificate installations when multiple certificates are being imported as one file.
Because your DigiCert-issued SSL Certificate (host certificate) requires an intermediate certificate (chained certificate), Google App Engine requires that you append the intermediate certificate to the end of your SSL Certificate.
You can use a text editor or the command line to create your new SSL Certificate concatenated .pem file.
Using a Text Editor to Create a .pem with the Server and Intermediate Certificates
Using the Command Line to Create a .pem with the Server and Intermediate Certificates
Using a Text Editor to Create a .pem with the Server and Intermediate Certificates
Open a text editor (such as Notepad or WordPad) and paste the entire body of each certificate into one text file in the following order:
The Primary Certificate – your_domain_name.crt
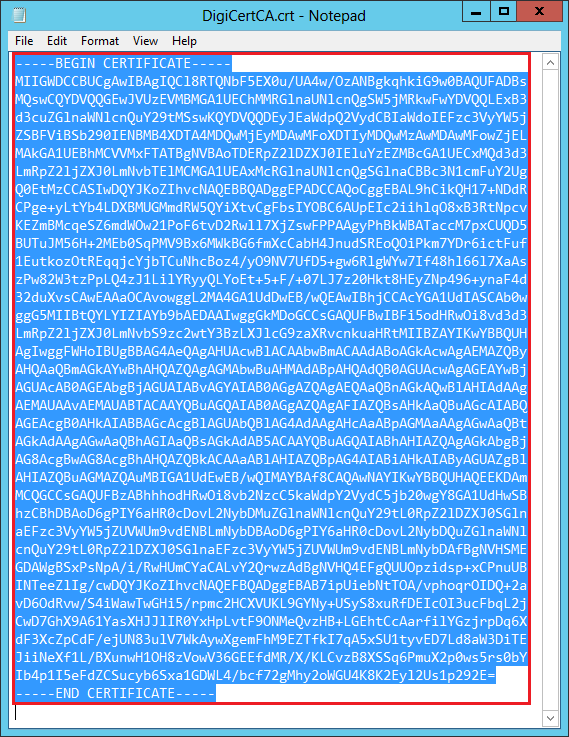
The Intermediate Certificate – DigiCertCA.crt
Make sure to include the -----BEGIN CERTIFICATE----- and -----END CERTIFICATE----- tags on each certificate.
The text file should look like this:
-----BEGIN CERTIFICATE-----
(Your Primary SSL certificate: your_domain_name.crt)
-----END CERTIFICATE-----
-----BEGIN CERTIFICATE-----
(Your Intermediate certificate: DigiCertCA.crt)
-----END CERTIFICATE-----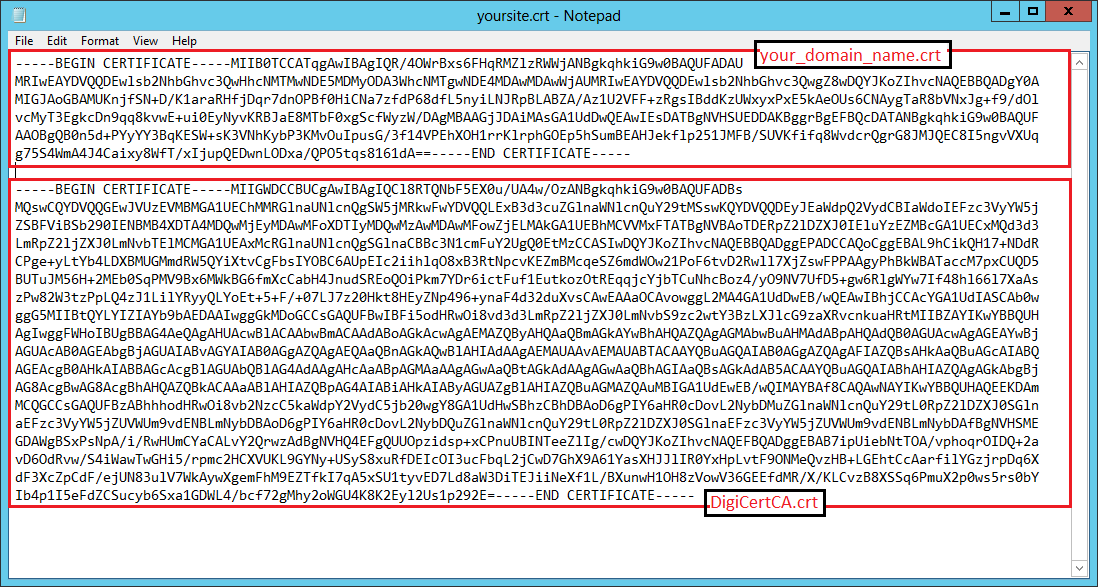
Save the combined file as your_domain_name.pem.
The SSL Certificate .pem file (your_domain_name.pem) is now ready to upload to the Google Admin console.
Using the Command Line to Create a .pem with the Server and Intermediate Certificates
Open the folder that contains the Primary Certificate – your_domain_name.crt and the Intermediate Certificate – DigiCertCA.crt.
Hold down the shift key and right-click in the folder, and select Open command window here.
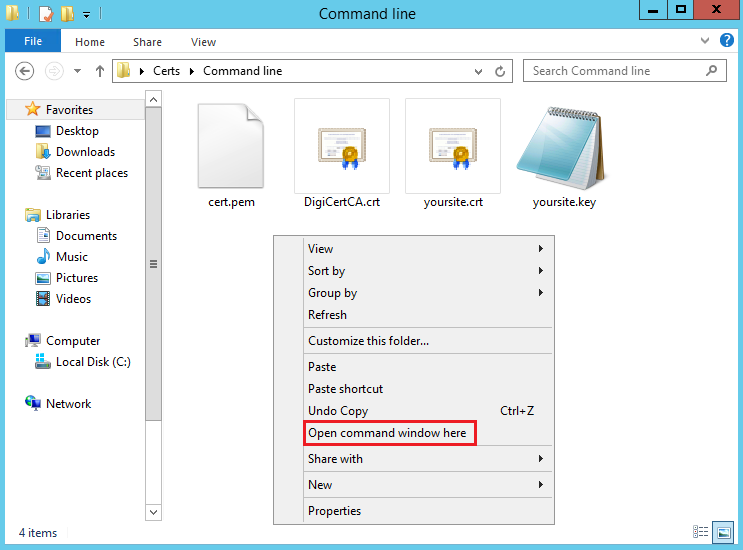
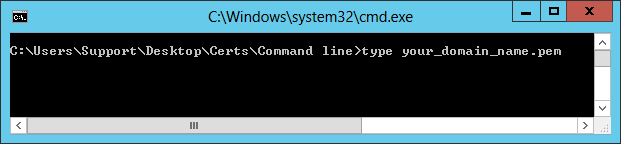
In the Command line, type the following command:
type your_domain_name.crt DigiCertCA.crt > your_domain_name.pem
Note: Make sure to replace your_domain_name with the name of your Server Certificate.

To see your appended Server Certificate (your_domain_name.pem), type the following command:
type your_domain_name.pem
Note: Make sure to replace your_domain_name with the name of your Server Certificate.
The SSL Certificate .pem file (your_domain_name.pem) is now ready to upload to the Google Admin console.

Google App Engine | Uploading and Configuring Your SSL Certificate
To install your Google App Engine SSL Certificate, first, you need to upload the certificate to the Google Admin console. Then, you need to configure the certificate.
Because every environment is different (for example, your settings may be configured differently), you may need to consult your Google App Engine documentation. For more advanced configuration, you should consult the Google documentation.
Uploading Your Certificate and Private Key
Log in to the Google Admin console as a Super Admin.
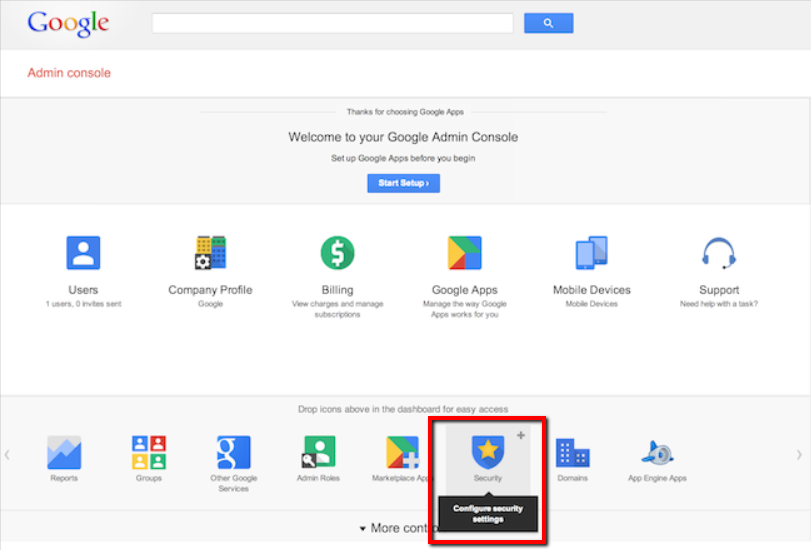
In the console, click Security > (optional) Show more > SSL for Custom Domains.
This link only appears if you have set up a subdomain.
Click Configure SSL certificate.
On the SSL Certificate Configuration page, in the New Certificate section, click Upload a new certificate.

Under PEM encoded X.509 certificate, click Choose File to locate and select your_domain_name.pem certificate file.
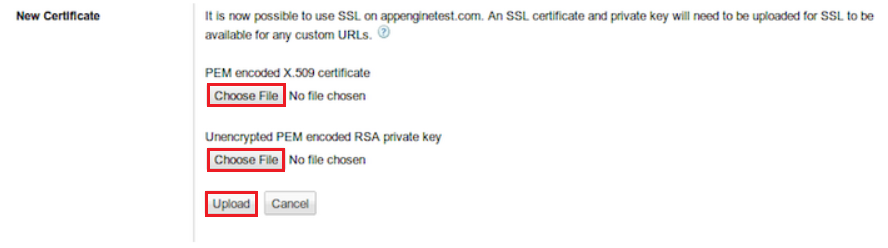
Under Unencrypted PEM encoded RSA private key, click Choose File to locate and select your_domain_name.key private key file.
Note: The .key file that you received when you exported your SSL Certificate in Apache-compatible format is a .pem-formatted file.
After you have selected your certificate and private key, click Upload.
Configuring Your Certificate
After successfully uploading your certificate and key files, you can configure your SSL Certificate.
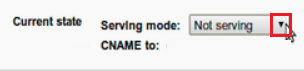
In the Current state section, in the Serving mode drop-down list, select a serving method.
The list only displays the available serving methods, which are determined by whether you have VIP, SNI, or VIP and SNI certificate slots. Note that the SNI + VIP option does not use a SNI certificate slot; instead, the certificate is assigned to the VIP that is listed.
For more information about serving modes, see the Google App Engine documentation.
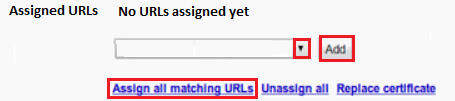
In the Assigned URLs section, do one of the following:
Manually add each matching URL.
In the drop-down list, select a matching URL and then click Add.
Add all matching URLs.
Click Assign all matching URLs.
For more information about matching URLs, see the Google App Engine documentation.
To change the CNAME record for your assigned URLs to the CNAME provided in the CNAME to field, contact your DNS provider.
For more information about the CNAME to field, see the Google App Engine documentation.
When you are finished, at the bottom of the page, click Save.
Your SSL Certificate has now been successfully uploaded and configured.
For more information about installing Google App Engine SSL Certificates, see Google’s documentation.
-

The most-trusted global provider of high-assurance TLS/SSL, PKI, IoT and signing solutions.
-


-
© 2022-2025, DigiCert, Inc. All rights reserved.
Cookie Settings
