
Knowledge Base
Mac | Back Up or Export Your Client Certificate
After you generate and install your Client Certificate, we recommend backing it up. The backup copy saves you from needing to generate a new certificate should you transfer to a new computer.
The backup copy also allows you to import your certificate into a Keychain or Certificate Store, should you want to use a different browser to log in to your DigiCert account. Client Certificates may be limited to a specific browser(s).
- Mac installs the Client Certificate in its own Certificate Store and can be shared by the keychain for Safari and Chrome.
- Firefox installs the Client Certificate in its own Certificate Store and can only be accessed by Firefox (Windows or Mac).
- Windows installs the Client Certificate in its own Certificate Store and can be shared by Chrome and Internet Explorer.
After you have exported your Client Certificate with private key, you can import the certificate into a Keychain or other Certificate Stores so that you can log into your DigiCert account using another browser. See (Mac) Importing Your Client Certificate.
How to Back Up (Export) Your Client Certificate
Safari | Backing Up (Exporting) Your Client Certificate
Open Keychain Access.
In the Finder window, under Favorites, click Applications, click Utilities, and then click Keychain Access.

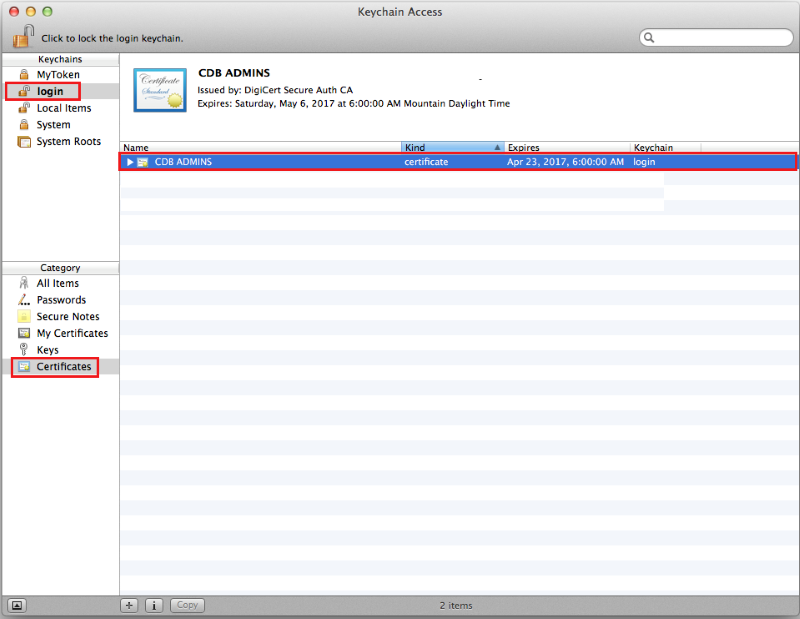
In the Keychain Access window, under Keychains, click Login, under Category, click Certificates, and select your Client Certificate.
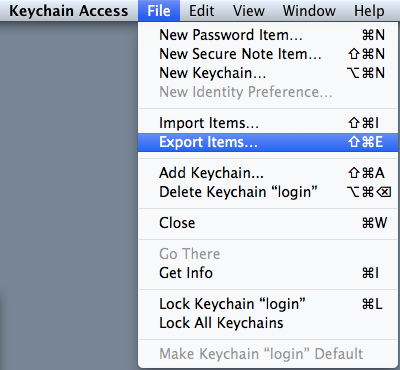
In the Keychain Access toolbar, click File > Export Items.
In the “Export” window, do the following:
In the File Format drop-down list, select Personal Information Exchange (.p12).
Note: A .p12 file uses the same format as a .pfx file.
In the Save As box, go to where you want to save the Client Certificate (with private key) .p12 file.
Make sure to save the .p12 file in a location that you will remember.
Name the certificate .p12 file (i.e., myClientCertificate) and click Save.

In the “Password” window, in the Password and Verify boxes, create and verify your password and click OK.

Your Client Certificate with private key has now been backed up (exported) as a .p12 file.
Chrome | Backing Up (Exporting) Your Client Certificate
In Chrome, go to Settings.

On the Settings page, below Default browser, click Show advanced settings.

Under HTTPS/SSL, click Manage certificates.

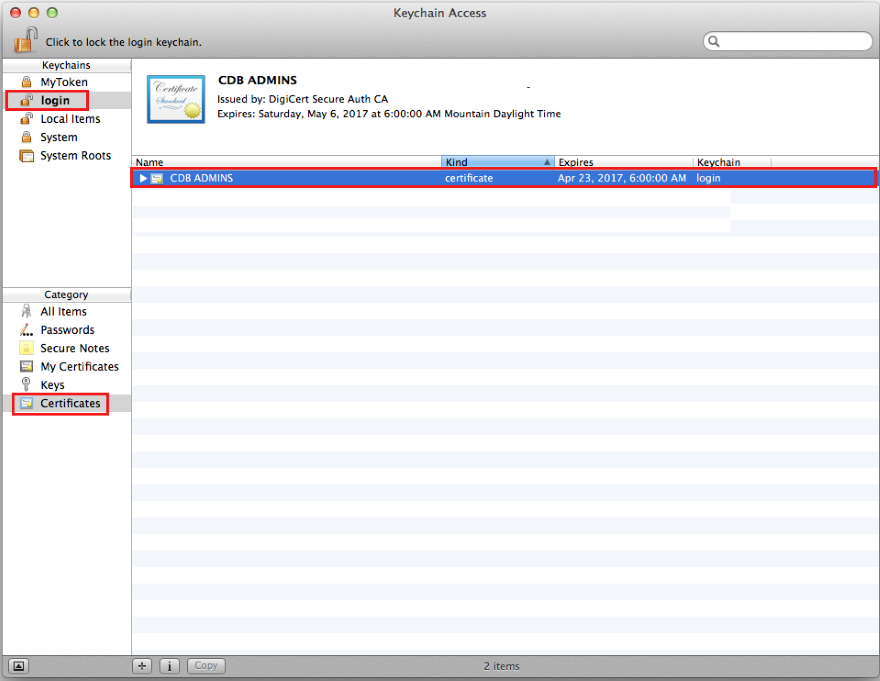
In the Keychain Access window, under Keychains, click Login, under Category, click Certificates, and select your Client Certificate.
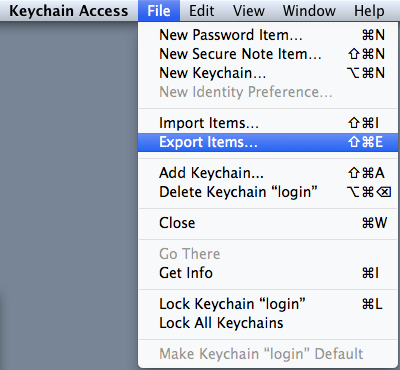
In the Keychain Access toolbar, click File > Export Items.
In the “Export” window, do the following:
In the File Format drop-down list, select Personal Information Exchange (.p12).
Note: A .p12 file uses the same format as a .pfx file.
In the Save As box, go to where you want to save the Client Certificate (w/private key) .p12 file.
Make sure to save the .p12 file in a location that you will remember.
Name the certificate .p12 file (i.e., myClientCertificate) and click Save.

In the “Password” window, in the Password and Verify boxes, create and verify your password and click OK.

Your Client Certificate with private key has now been backed up (exported) as a .p12 file.
Firefox | Backing Up (Exporting) Your Client Certificate
In Firefox, go to Preferences.

In the Preferences window, click Advanced, click Certificates, and then click View Certificates.
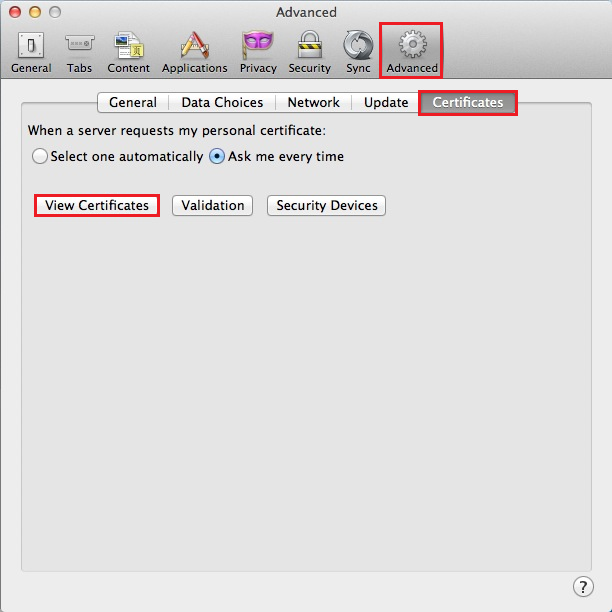
In the Certificate Manager window, click Your Certificates, select your Client Certificate, and click Backup.

In the File Name to Backup window, do the following:
In the Format drop-down list, select PKCS12 Files.
Note: A .p12 file uses the same format as a .pfx file.
In the Save As box, go to where you want to save the Client Certificate (with private key) .p12 file.
Make sure to save the .p12 file in a location that you will remember.
Name the certificate .p12 file (i.e., myClientCertificate) and click Save.

In the Certificate Manager window, create a Certificate backup password and click OK.
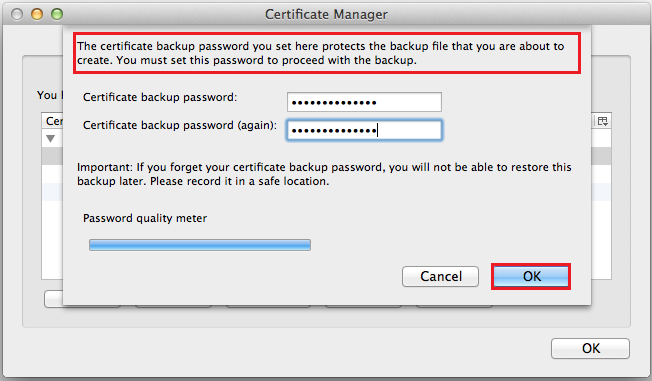
When you receive the “Successfully backed up your security certificate(s) and private key(s)” message, click OK.
Your Client Certificate with private key has now been backed up as a .p12 file.

