- Contact Us
-

choose your language
-

Knowledge Base
Novell ConsoleOne | SSL Certificate Installation
Installing your SSL Certificates in Novell Console One
If you have not yet created a Certificate Signing Request (CSR) and ordered your certificate, see
SSL Certificate CSR Creation | ConsoleOne.
How to install your SSL Digital Certificate
If you received a .p7b file in an email from DigiCert or are able to log in to your account to download a certificate bundle (.p7b) file, go ahead and skip forward to step 6.
Otherwise, steps 1-5 will walk you through the process of creating a .p7b file from standard format SSL certificate files.
Download the Primary, Intermediate, and Root certificate files from your DigiCert account.
Import the root and intermediate certificates into Internet Explorer
On a Windows Computer, double-click each certificate file and click the 'Install Certificate...' button to start the Certificate import wizard. The TrustedRoot.crt certificate must go into your Trusted Root Certification Authorities store, and the Intermediate certificate (DigiCertCA.crt) must go into your Intermediate Certification Authorities store.
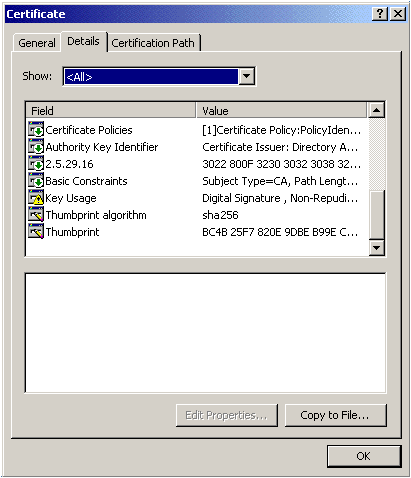
Double-click the Primary SSL Certificate (your_domain_name.crt) for your domain. Go to the details tab, and click on Copy to File.
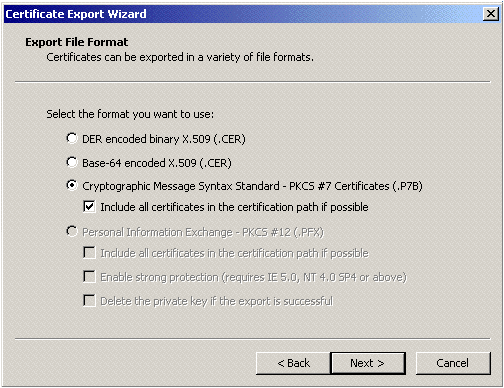
Choose "Cryptographic Message Syntax Standard - PKCS #7 Certificates (.P7B)" and check the "Include all certificates in the certification path if possible" box.
Give it a name, and finish. This will create a single bundled certificate from the three individual certificates.
Go to ConsoleOne and then to the certificate that created the CSR.
In the Public Key Certificate Tab, choose Import, select "No Trusted Root Certificate available". Click Next, and then import the Server Certificate you created.
Note: You may receive a warning that says 'The subject name requested when the key pair was generated does not match the subject name in the certificate being stored...' -- If you receive this warning, please hit the OK button to import the certificate anyway.
After you have validated the certificate, it is ready for use.
Note: If you click on the Validate button, you may receive a warning about reading the Certificate Revocation list. This appears to be a problem with ConsoleOne's validator and does not affect the installation of your certificate. You can verify that your certificate is installed correctly by using DigiCert's SSL Certificate Tester
-

The most-trusted global provider of high-assurance TLS/SSL, PKI, IoT and signing solutions.
-


-
© 2022-2025, DigiCert, Inc. All rights reserved.
Cookie Settings
