
Knowledge Base
Windows | Back Up or Export Your Client Certificate
After you generate and install your Client Certificate, we recommend that you back it up. The backup copy saves you from needing to generate a new certificate should you transfer to a new computer.
The backup copy also allows you to import your certificate into a Certificate Store should you want to use a different browser to log into your DigiCert account. Client Certificates may be limited to a specific browser(s).
- Windows installs the Client Certificate in its own Certificate Store and can be shared by Chrome and Internet Explorer.
- Mac installs the Client Certificate in its own Certificate Store and can be shared by the keychain for Safari and Chrome.
- Firefox installs the Client Certificate in its own Certificate Store and can only be accessed by Firefox (Windows or Mac).
After you have exported your Client Certificate with private key, you can import the certificate into other Certificate Stores so that you can log into your DigiCert account using another browser.
See (Windows) Importing Your Client Certificate into a Certificate Store.
How to Back Up (Export) Your Client Certificate
Internet Explorer
Chrome
Firefox
Internet Explorer | Backing Up (Exporting) Your Client Certificate
In Internet Explorer, go to Internet Options.
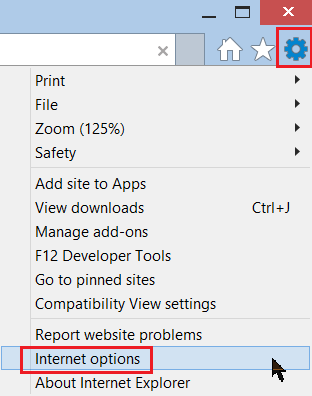
In the Internet Options window, on the Content tab, click Certificates.
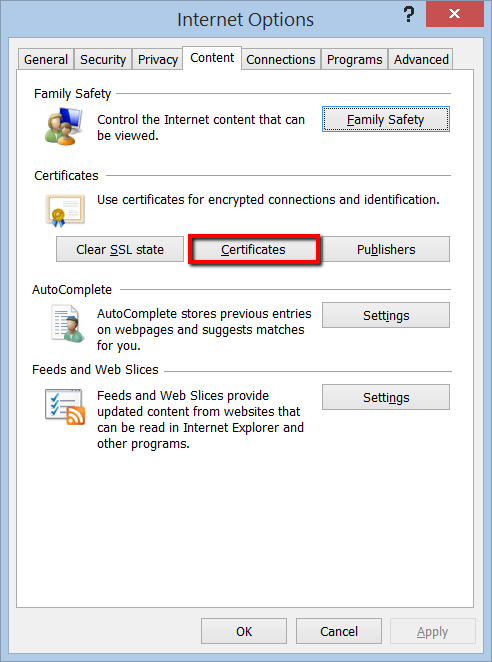
In the Certificates window, on the Personal tab, select your Client Certificate and click Export.
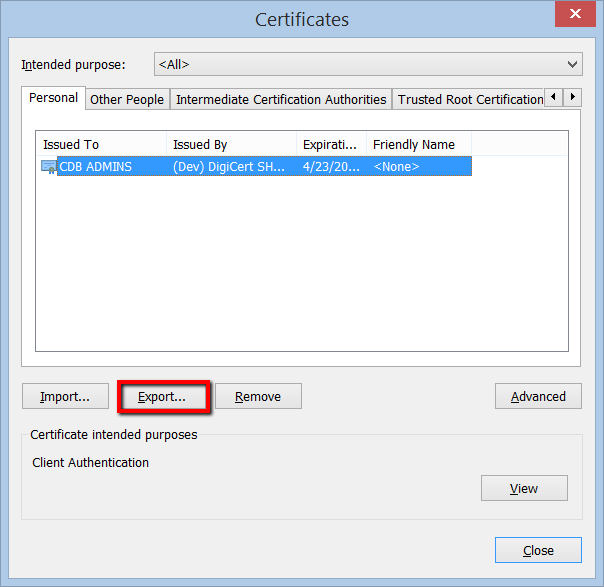
In the Certificate Export Wizard, on the Welcome page, click Next.
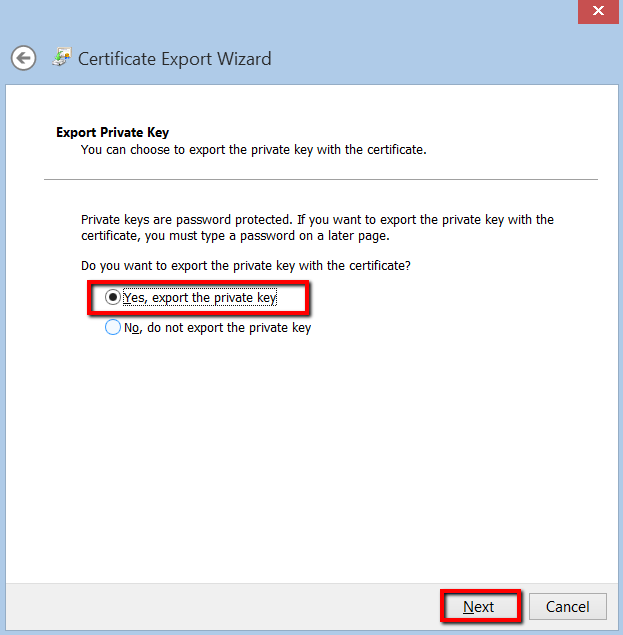
On the Export Private Key page, select Yes, export private key and click Next.
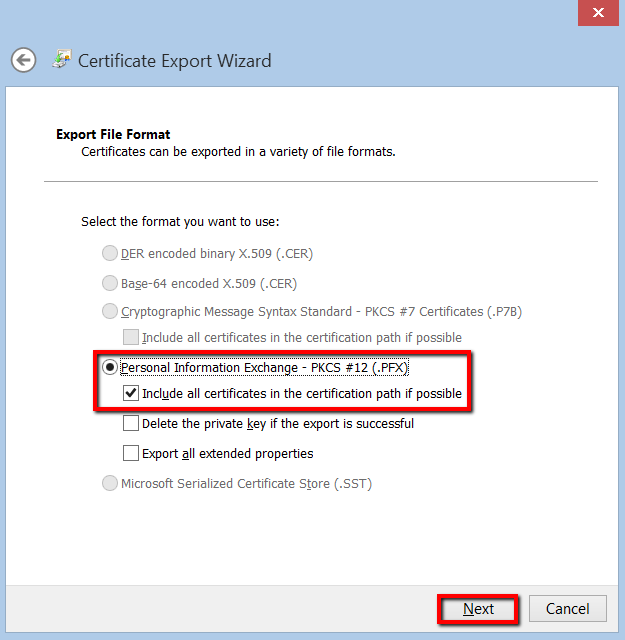
On the Export File Format page, select Personal Information Exchange – PKCS #12 (.PFX), check Include all certificates in the certification path if possible, and click Next.
On the Security page, check Password.
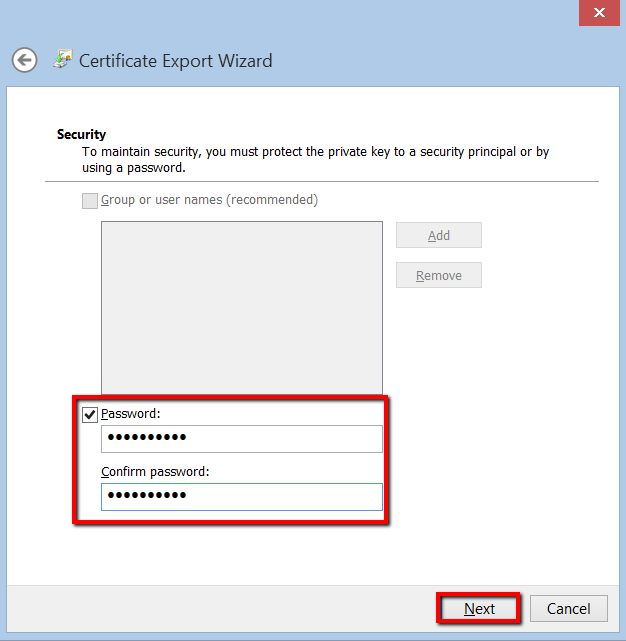
In the Password and Confirm password boxes, type your password, and then click Next.
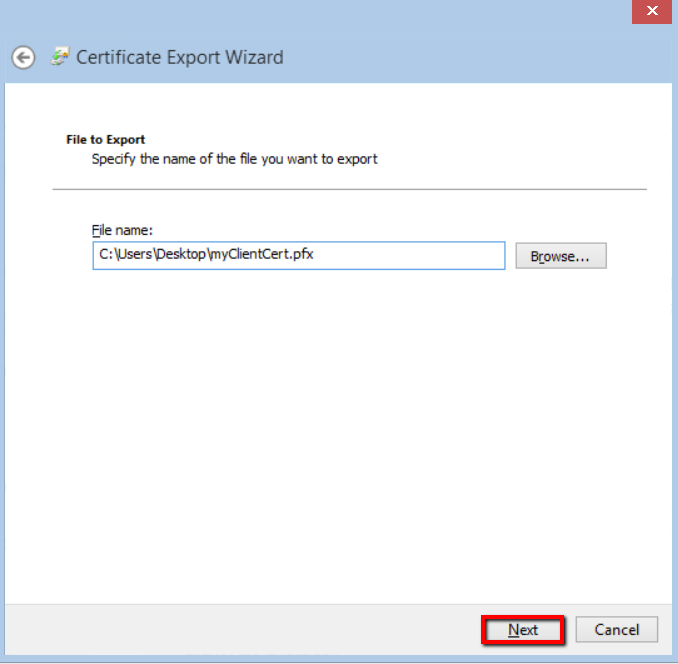
On the File to Export page, click Browse, locate where you want to save the Client Certificate (w/private key) .pfx file, provide a file name (i.e., myClientCert), click Save, and click Next.
Make sure to save the .pfx file in a location that you will remember.
On the Completing the Certificate Export Wizard page, review the settings and click Finish.
When you receive the “The export was successful” message, click OK.
Your Client Certificate with private key has now been backed up (exported) as a .pfx file.
Chrome | Backing Up (Exporting) Your Client Certificate
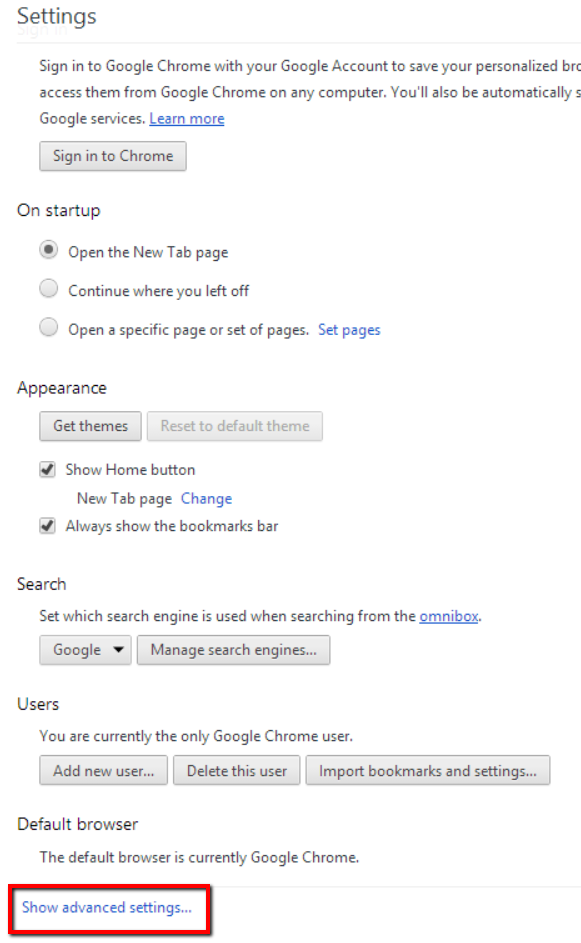
In Chrome, go to Settings.
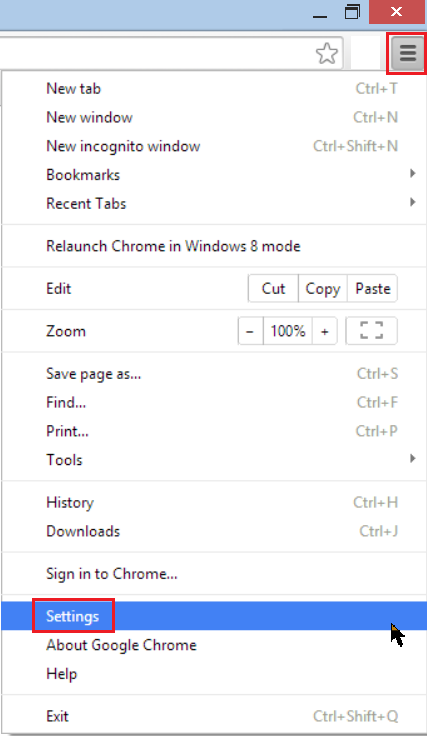
On the Settings page, below Default browser, click Show advanced settings.
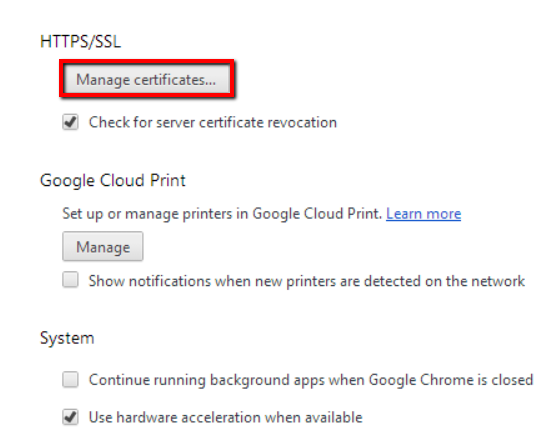
Under HTTPS/SSL, click Manage certificates.
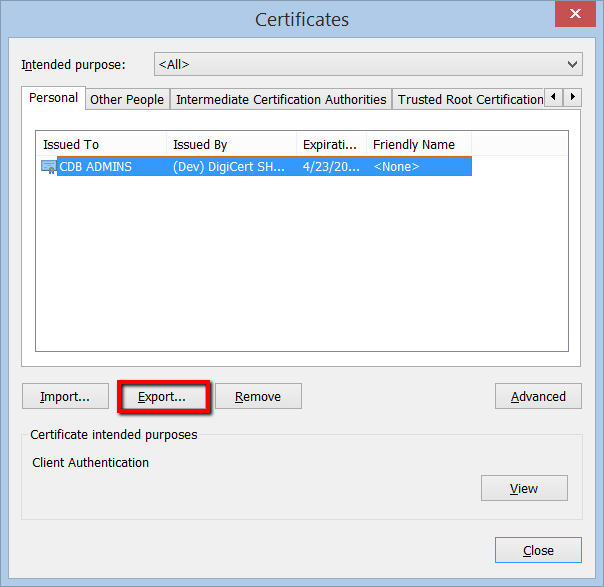
In the Certificates window, on the Personal tab, select your Client Certificate and click Export.
In the Certificate Export Wizard, on the Welcome page, click Next.
On the Export Private Key page, select Yes, export private key, and click Next.

On the Export File Format page, select Personal Information Exchange – PKCS #12 (.PFX), check Include all certificates in the certification path if possible, and click Next.

On the Security page, check Password.

In the Password and Confirm password boxes, type your password, and then click Next.
On the File to Export page, click Browse, locate where you want to save the Client Certificate (w/private key) .pfx file, provide a file name (i.e., myClientCert), click Save, and click Next.
Make sure to save the .pfx file in a location that you will remember.

On the Completing the Certificate Export Wizard page, review the settings and click Finish.
When you receive the “The export was successful” message, click OK.
Your Client Certificate with private key has now been backed up (exported) as a .pfx file.
Firefox | Backing Up (Exporting) Your Client Certificate
In Firefox, go to Options.
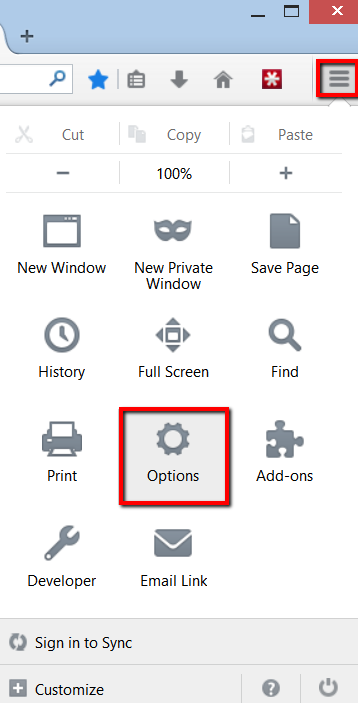
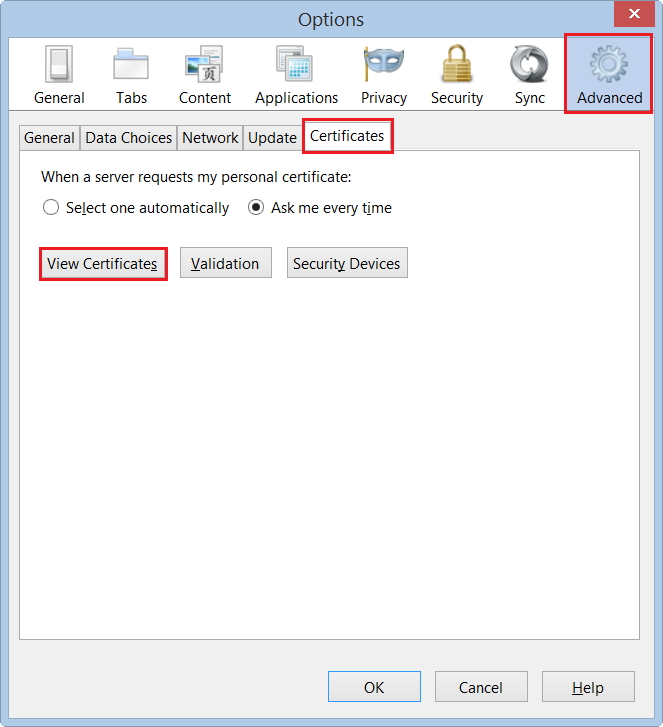
In the Options window, click Advanced, next, click the Certificates tab, and click View Certificates.
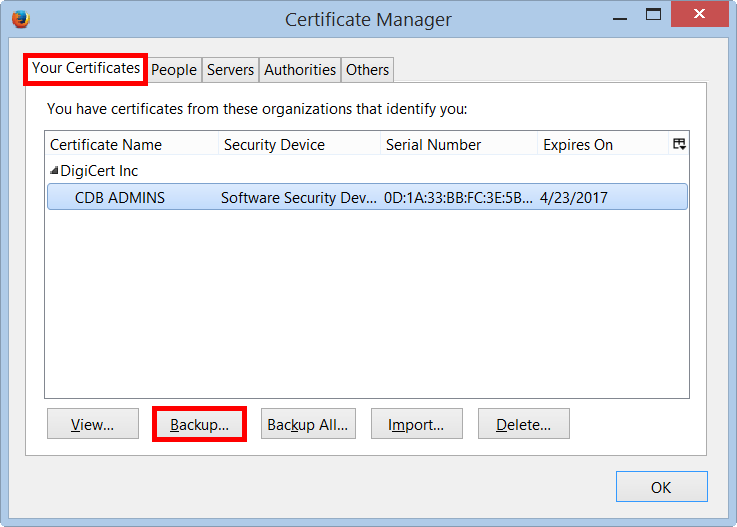
In the Certificate Manager window, on the Your Certificates tab, select your Client Certificate and click Backup.
In the File Name to Backup window, go to where you want to save the Client Certificate (w/private key) .p12 file, provide a file name (i.e., myClientCertificate), and then click Save.
Make sure to save the .p12 file in a location that you will remember.
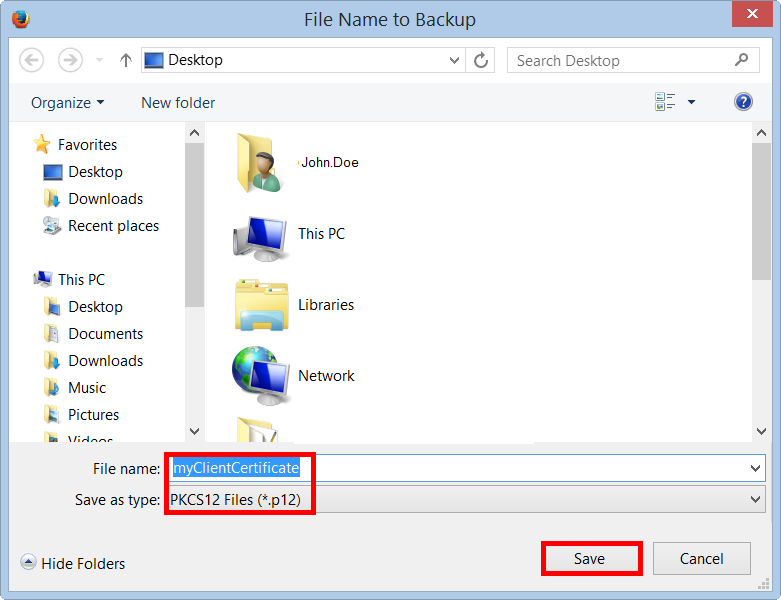
Note: A .p12 file uses the same format as a .pfx file. If you want, you can change the extension to .pfx and resave the file as a .pfx file if needed.
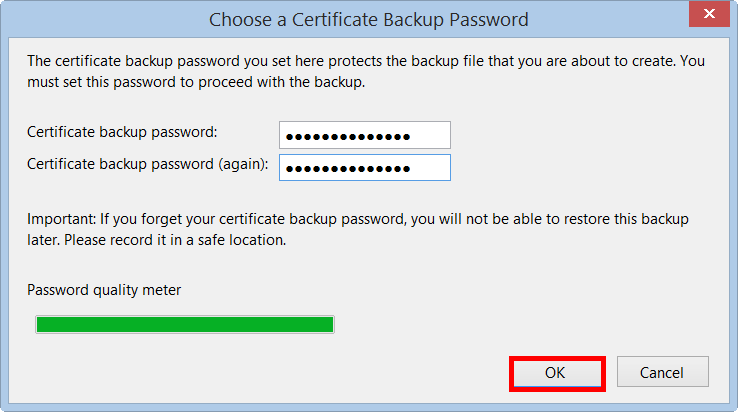
In the Choose a Certificate Backup Password window, create a Certificate backup password and click OK.
When you receive the “Successfully backed up your security certificate(s) and private key(s)” message, click OK.
Your Client Certificate with private key has now been backed up as a .p12 file.

