- お問い合わせ
-

choose your language
-

Knowledge Base
Windows | Importing Your Client Certificate into a Certificate Store (日本語)
新しいコンピューターに切り替えた場合、または別のブラウザーを使用して DigiCert アカウントにアクセスする予定の場合は、クライアント証明書を正しい
証明書ストアにインポートする必要があります。
クライアント証明書をまだエクスポートしていない場合 下記ページをご参照ください。 Windows | Back Up or Export Your Client Certificate (日本語).
クライアント証明書を秘密キーとともにエクスポートしたら、適切な証明書ストアに証明書をインポートして、新しいコンピューターまたは別のブラウザーを使用して DigiCert アカウントにログインできるようになります。
クライアント証明書をインポートする方法
Internet Explorer
Chrome
Firefox
Internet Explorer | Importing Your Client Certificate
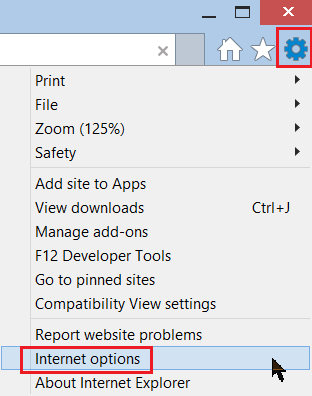
In Internet Explorer, go to Internet Options.
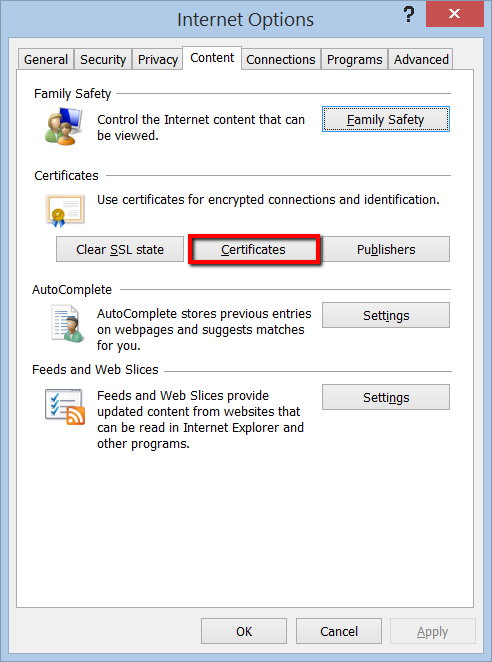
In the Internet Options window, on the Content tab, click Certificates.
In the Certificates window, on the Personal tab, click Import.

In the Certificate Import Wizard, on the Welcome page, click Next.
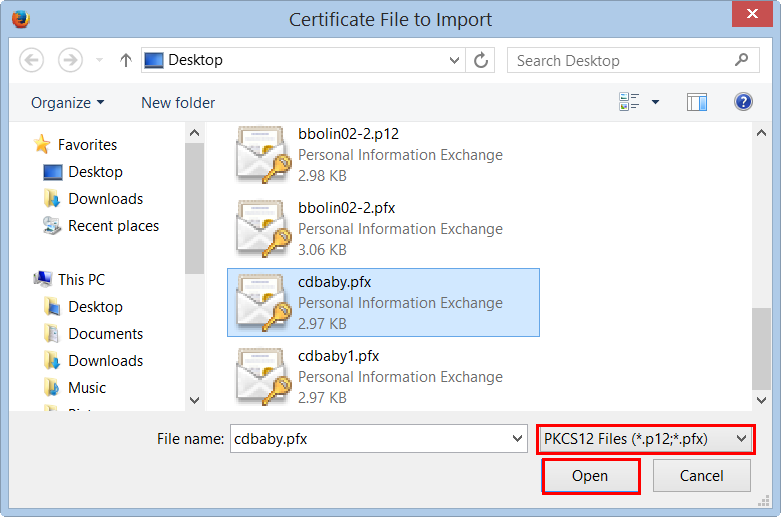
On the File to Import page, click Browse.
In the File Explorer Open window, in the file type drop-down list, select Personal Information Exchange (*.pfx;*.p12).
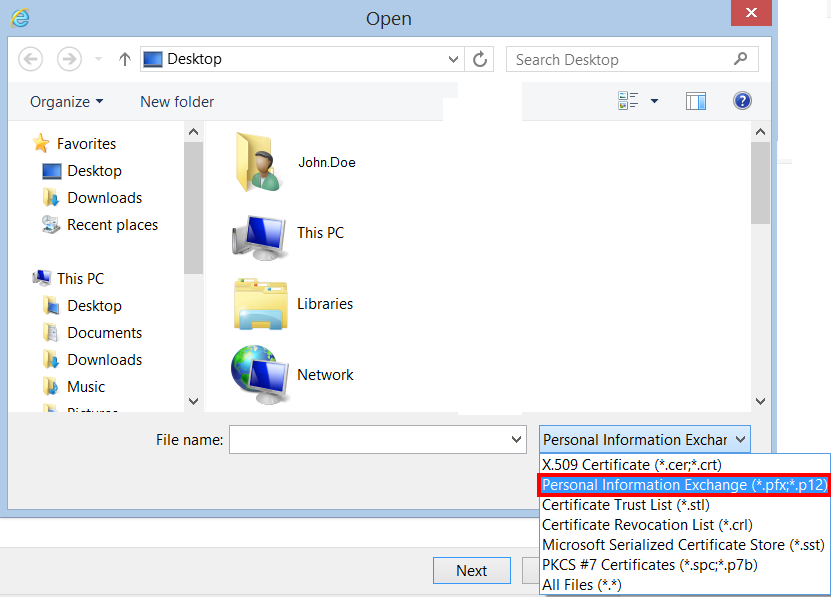
Locate and select your Client Certificate .pfx or .p12 file, and then click Open.
On the File to Import page, click Next.
On the Private key protection page, check Mark this key as exportable and Include all extended properties.
Mark this key as an exportable option enables you to export your Client Certificate with private key should you need to in the future.
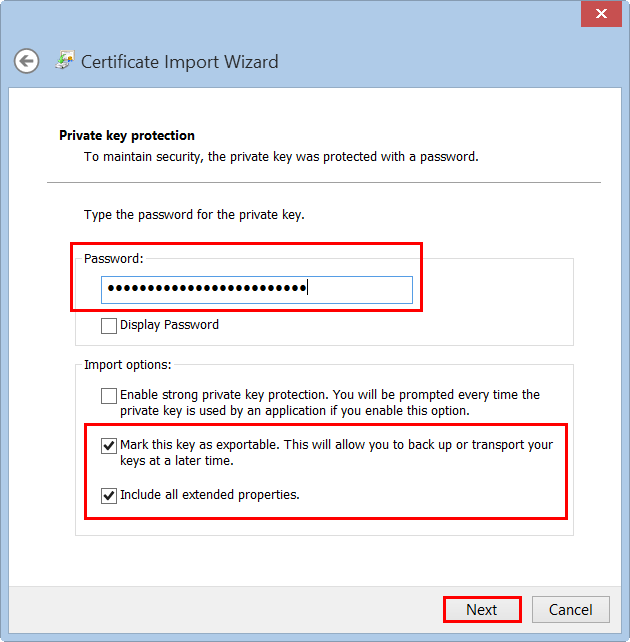
In the Password box, type the password that you created when you exported your Client Certificate with private key, and click Next.
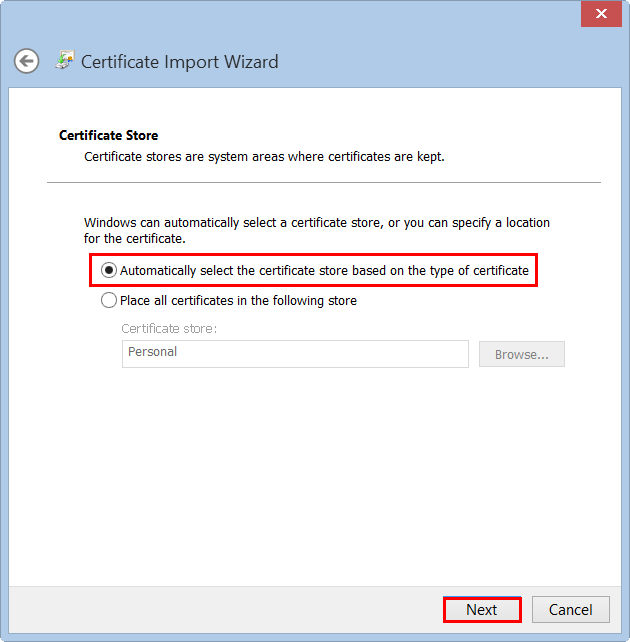
On the Certificate Store page, click Automatically select the certificate store based on the type of the certificate, and click Next.
We recommend that you use this option so that intermediate and root certificates in the .pfx or .p12 file are placed in the appropriate Certificate Store.

On the Completing the Certificate Import Wizard page, review the settings and click Finish.
When you receive the “The import was successful” message, click OK.
Your Client Certificate with private key is now imported into the Windows Certificate store, and you can use Internet Explorer and Chrome to log into your DigiCert account.
Chrome | Importing Your Client Certificate
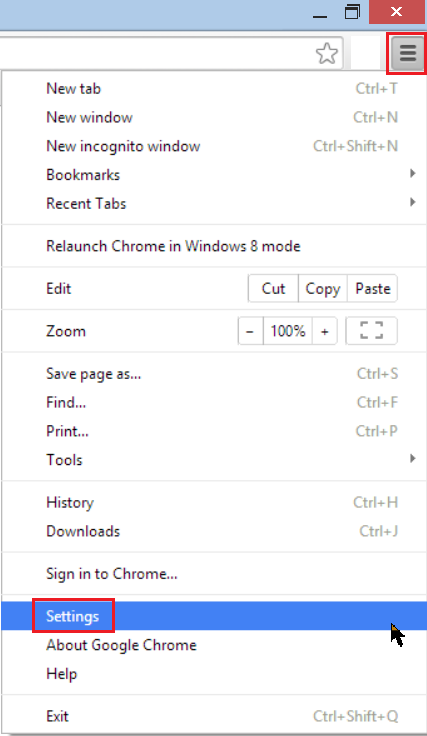
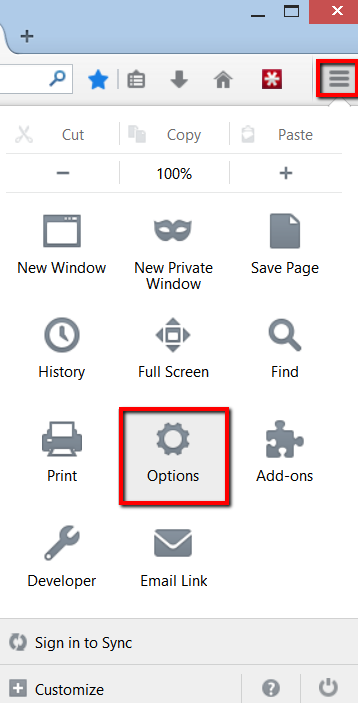
Chrome上で 設定をクリックします。
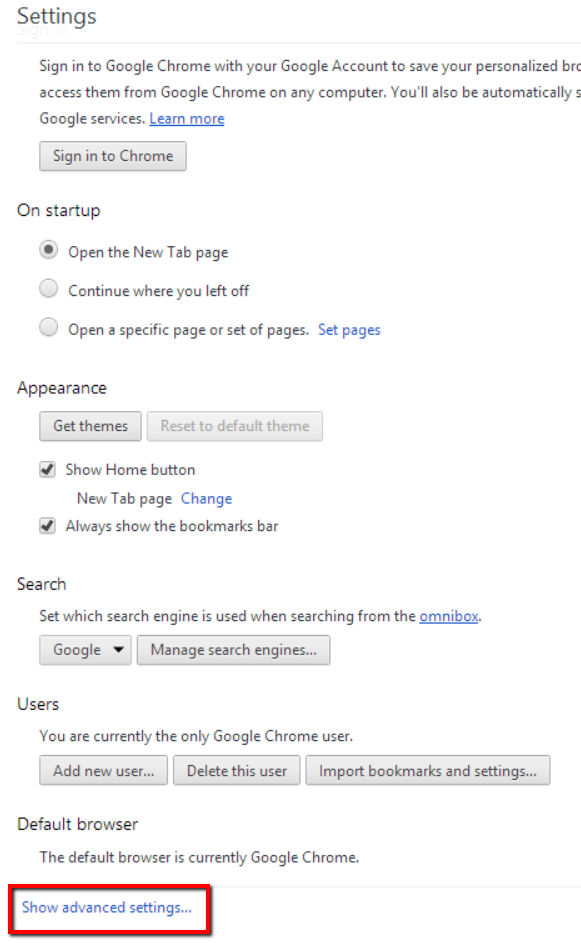
設定 ぺーじで、デフォルトブラウザ 下の 詳細を提示をクリックします。.
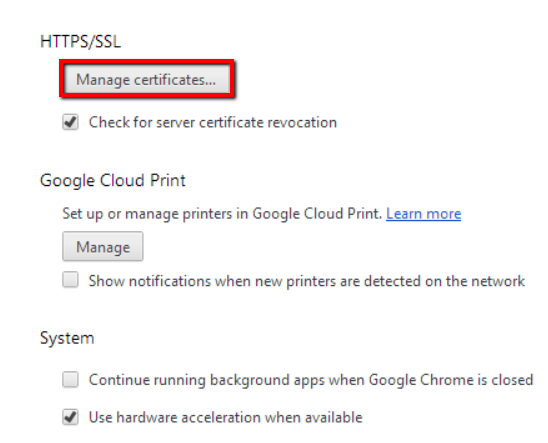
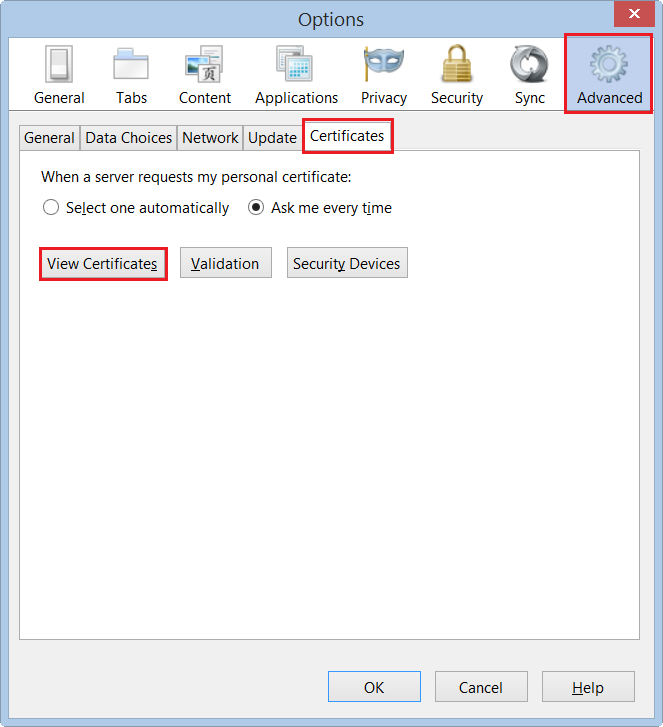
HTTPS/SSL下の 証明書の管理をクリックします。
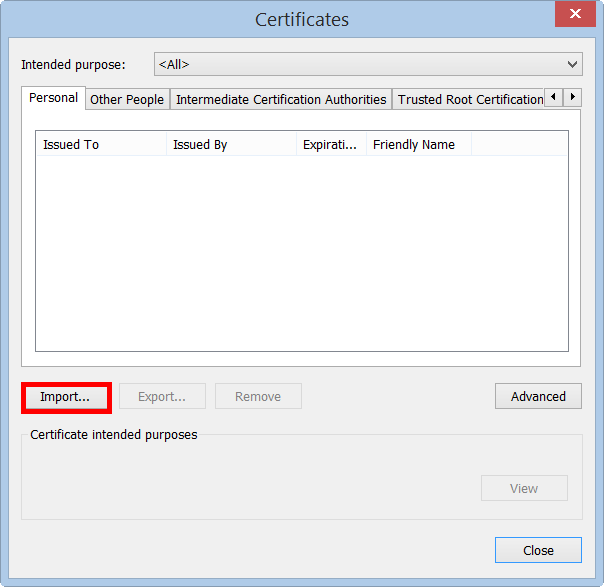
証明書 ウインドウ内の Personal タブで インポートをクリックします。
証明書インポートウイザード内の, Welcomeページで 次へをクリックします。
ファイルをインポート ページで Browseをクリックします。
ファイル エクスプローラーのOpen ウインドウのファイルタイプのドロップダウンリストの中から Personal Information Exchange (*.pfx;*.p12)を選択しクリックします。

.pfx または .p12 ファイルのクライアント証明書 を選択し、開くをクリックします。
ファイルをインポート ページで次へをクリックします。
プライベート鍵プロテクション ページで この鍵をエクスポート可能としてマークし、すべての拡張プロパティを含める にチェックを入れます。
このキーをエクスポート可能なオプションとしてマークすると、将来必要になった場合に、秘密鍵付きのクライアント証明書をエクスポートできます。
パスワード欄に、秘密鍵付きクライアント証明書をエクスポートした際に作成したパスワードを入力し、次へをクリックします。
証明書ストアのページで、証明書の種類に基づいて証明書ストアを自動的に選択するをクリックし、次へをクリックします。
.pfx または .p12 ファイル内の中間証明書とルート証明書が適切な証明書ストアに配置されるように、このオプションを使用することをお勧めします。
証明書インポートウィザードの完了ページで、設定を確認し、完了をクリックします。
インポートは成功しましたというメッセージが表示されたら、OKをクリックしてください。
秘密鍵付きのクライアント証明書がWindows証明書ストアにインポートされました。Chromeを使用してDigiCertアカウントにログインできます。
Firefox | Importing Your Client Certificate
Firefoxのオプションをクリックします。
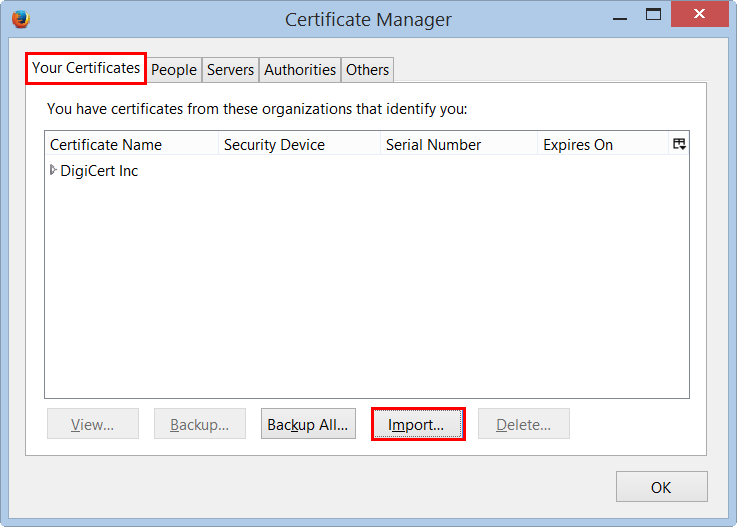
オプション ウィンドウで 詳細 をクリックし、次に 証明書タブをクリックして、 証明書の表示をクリックします。
証明書マネージャーウィンドウの証明書タブで、インポートをクリックします。
インポートする証明書ファイルウィンドウで、ファイルタイプのドロップダウンリストからPKCS12 Files (*.pfx;*.p12)を選択します。
次に、クライアント証明書の.pfxまたは.p12ファイルに移動し、Openをクリックします。
パスワード入力ダイアログウィンドウのパスワードボックスに、秘密鍵付きクライアント証明書をエクスポートしたときに作成したパスワードを入力し、OKをクリックします。
.セキュリティ証明書と秘密鍵が正常に復元されましたというメッセージが表示されたら、OKをクリックしてください。
秘密鍵付きのクライアント証明書がFirefoxの証明書ストアにインポートされました。これでFirefoxを使ってDigiCertアカウントにログインできます。
-

法人向けTLS/SSLサーバ証明書、PKI、IoT、署名ソリューションを提供するグローバルリーディングカンパニーです。
-


-
© 2022-2025, DigiCert, Inc. All rights reserved.
Cookie Settings
